A complete guide to retargeting animation in MotionBuilder. Learn how to import and connect characters, retarget animation and export files as FBX or BVH.
This tutorial will teach you everything you need to know about retargeting animation in MotionBuilder:
- Merging and connecting Characters and Actors.
- Importing skeletal animation and optical motion capture.
- Retargeting settings.
- Plotting animation to control rigs, skeletons and other objects.
- Plot Properties options.
- Preparing a character for export.
- Exporting a character as FBX or BVH.
The only slight problem is, all this information needs a VERY long post. To break it down a bit, I’ve tried to write the table of contents to read like a quick start guide. This way you can jump to the section you want or read it like a simple step-by-step guide (I’m thinking of using this idea in other tutorial so let me know what you think in the comments section at the bottom). Happy retargeting!
01 CONNECT CHARACTERS
The retargeting process begins by creating a live connection between a Source character and a Target character. This allows any animation applied to the Source character to be retargeted onto the Target character in real-time.
If you plan to remap multiple animations between the same 2 characters, it is worth creating a “Mapping File”. The “Mapping File” would contain the “Source” character connected to the “Target” character. When you have a file that requires remapping, you can simply open the “Mapping File” and import animation onto the “Source” character without the need to repeat the connection process.
Open the Source Character
IMPORTANT: THE “SOURCE” CHARACTER MUST BE CHARACTERIZED
Begin by opening a MotionBuilder file containing the “Source” character. The “Source” character could be an Actor asset connected to optical marker data or a characterised character with animation either already applied to it or with animation files associated with it.
…for retargeting Single Files
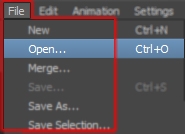
- File > Open… the “Source” character: From the File menu select Open… and use the Open File browser to navigate to the Source character file.
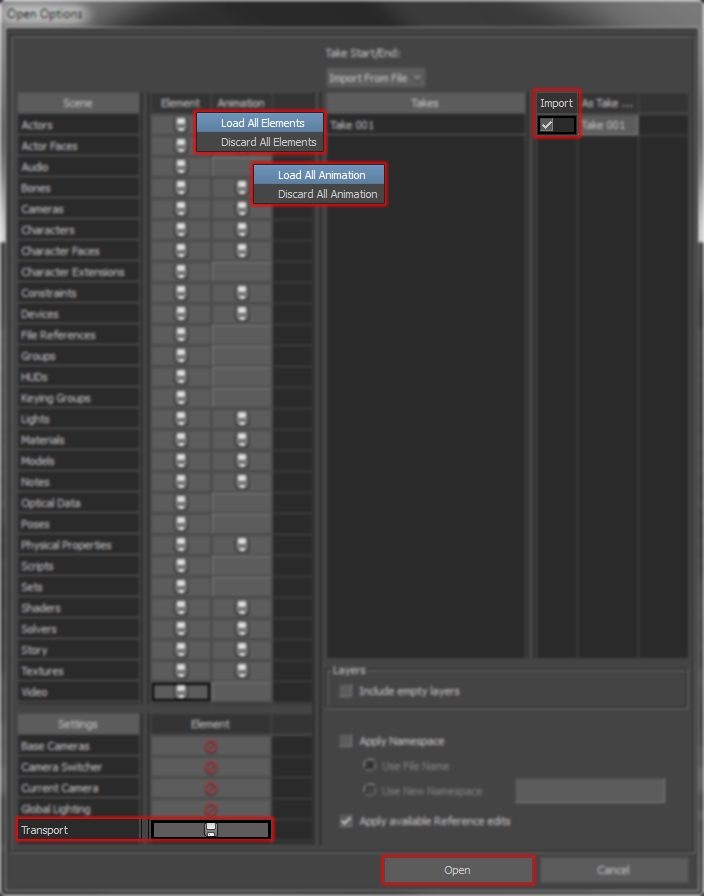
- Set Open Options: In theOpen Option window set the following options:
- Load All Elements: In the Scene section, right-click in the Elements column and select Load All Elements from the pop-up window.
- Load All Animation: In the Scene section, right-click in the Animation column and select Load All Animation from the pop-up menu.
- Transport Settings: In the Settings section, load the Transport This will set the Transport controls to the correct Frames Per Second (fps) playback based on the file you are opening.
- Load Takes: In the Takes section select the individual takes you want to import or left-click the Import column title to select all the takes in the file.
- Open: Finally, click Open.
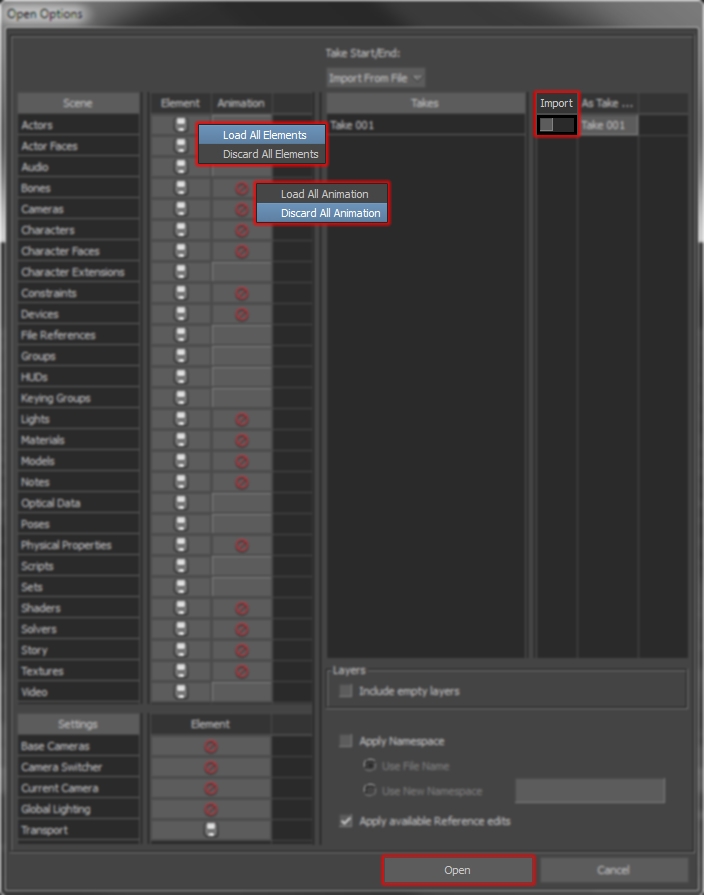
…for retargeting Multiple File
- File > Open… the “Source” character: From the File menu select Open… and use the Open File browser to navigate to the file containing the Source character.
- Set Open Options: In theOpen Option window set the following options:
- Load All Elements: In the Scene section, right-click in the Elements column and select Load All Elements from the pop-up window.
- Discard All Animation: In the Scene section, right-click in the Animation column and select Discard All Animation from the menu.
- Discard All Takes: In the Takes section, left-click the Import column title to deselect all the Takes. When the file opens it will contain no animation and an empty take named “Take 001”.
- Open: Finally, click Open.
Add Character to Namespace
If the character and all its associated elements aren’t in the same namespace add them to one now. This will prevent naming conflicts when merging the Target character and help delete all the Source character assets once the retargeting is complete.
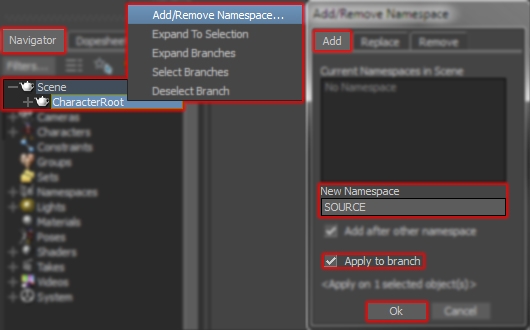
- Select Assets: In the Navigator window, expand the Scene branch and Left-Click the top node of the Source character hierarchy. Then, Right-Click it and click Select Branches from the pop-up menu. This should select all the assets associated with the Source Character.
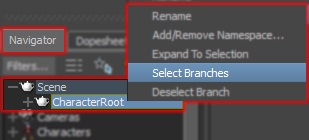
- Add “SOURCE” Namespace: Right-Click any of the selected assets in the Scene Browser and select Add/Remove Namespace… from the pop-up menu. Under the Add tab in the Add/Remove Namespace window, type “SOURCE” in the New Namespace box, tick Apply to branch followed by Ok.
Merge the Target Character
IMPORTANT: THE “TARGET” CHARACTER MUST BE CHARACTERIZED
The next step is to merge the “Target” character into the scene. The “Target” character must be characterised and should ideally have no animation applied to it.
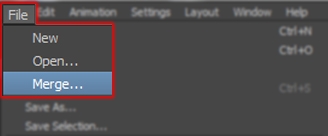
- File > Merge… the “Target”: From the File menu select Merge… and use the Open File browser to navigate to the file containing the Target character.
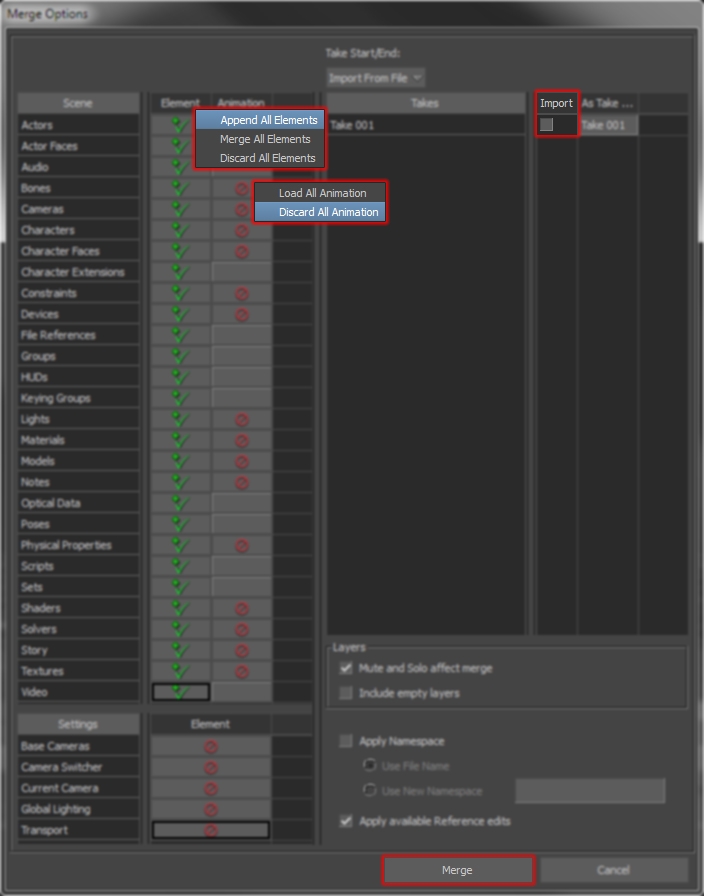
- Set Merge Options: In theMerge Option window set the following options:
- Append All Elements: In the Scene section, right-click in the Elements column and select Append All Elements from the pop-up window.
- Discard All Animation: In the Scene section, right-click in the Animation column and select Discard All Animation from the menu.
- Discard All Takes: In the Takes section, left-click the Import column title to deselect all the Takes. This makes sure the Target character is merged with no animation applied to it.
- Open: Finally, click Merge.
- Add “TARGET” Namespace: If the Target character and its associated assets aren’t already in the same namespace, add them now using the steps above.
Connect the Characters
The last part of the connection process is to set the “Source” character as the Input Source for the “Target” character. This creates a live connection between the two characters using the Source character’s motion to drive the Target character without transferring any key frames.
…for Actor Retargeting
- Open the Character Settings: In Navigator > Characters branch, double-click the “Target” character – usually the second character in the list if you’ve followed the steps above – and select the Character Settings
- Set Input Type to “Actor”: In the Character Settings tab, use the drop-down menu to set the Input Type to
- Set Input Source to Actor: In the Character Settings tab, use the drop-down menu to set the Input Source to the name of the Actor asset and click Active.
- Open the Character Settings: In Navigator > Characters branch, double-click the “Target” character – usually the second character in the list if you’ve followed the steps above – and select the Character Settings
- Set Input Type to “Character”: In the Character Settings tab, use the drop-down menu to set the Input Type to Character.
- Set Input Source to “Source” Character: In the Character Settings tab, use the drop-down menu to set the Input Source to the name of the Source character and click Active.

…for Character Retargeting
- Open the Character Settings: In Navigator > Characters branch, double-click the “Target” character – usually the second character in the list if you’ve followed the steps above – and select the Character Settings
- Set Input Type to “Character”: In the Character Settings tab, use the drop-down menu to set the Input Type to Character.
- Set Input Source to “Source” Character: In the Character Settings tab, use the drop-down menu to set the Input Source to the name of the Source character and click Active.

Save File
Now the characters are connected, it’s a good idea to save a version of the file. This allows you to return to the initial set-up file if anything goes wrong during the remaining retargeting process or to use this set-up as the “Mapping File” to retarget other animations between the same two characters.
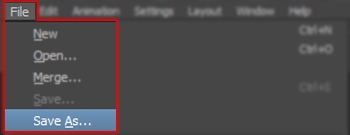
- Save the File: From the File menu select Save As… and use the Save File browser to navigate to a location you want to save the file.
- Set the File Name: Use a file name that makes it clear which character is connected to which, for example, “Retarget_<Source_Character>_TO_<Target_Character>.fbx”.
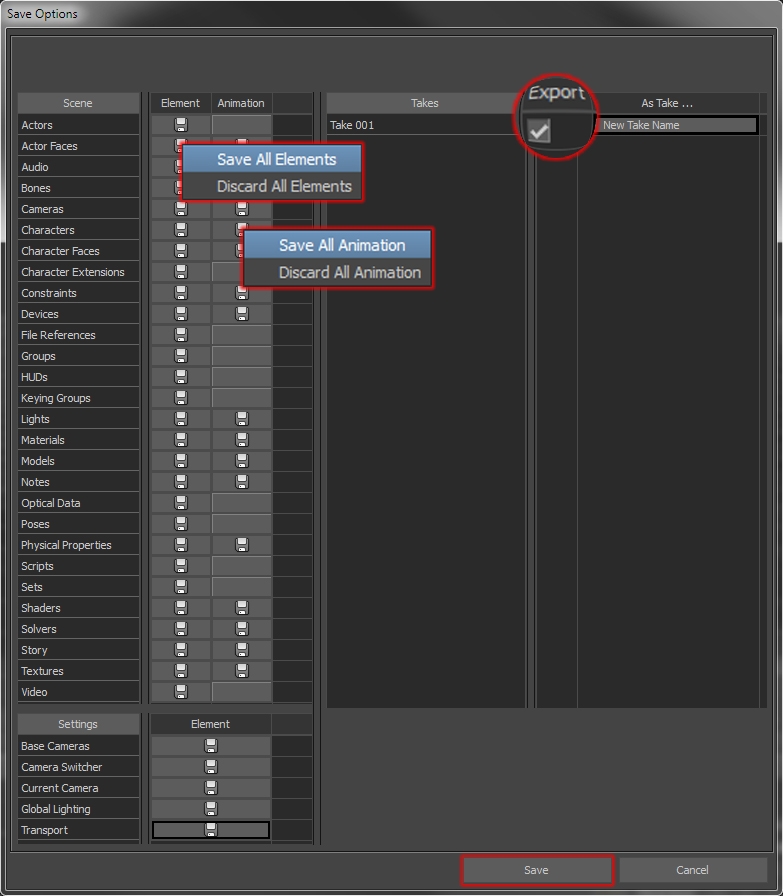
- Set Save Options: In theSave Option window set the following options:
- Save All Elements: In the Scene section, right-click in the Elements column and select Save All Elements from the pop-up window.
- Save All Animation: In the Scene section, right-click in the Animation column and select Save All Animation from the pop-up menu.
- Transport Settings: In the Settings section, right-click in the Element column and select Save All Settings from the pop-up window.
- Save All Takes: In the Takes section, select the individual takes you want to save or left-click the Export column title to select all the takes in the file.
- Save: Finally, click Save.
02 IMPORT ANIMATION
Once the characters are connected, the next step is to import the animation onto the “Source” character you want to retarget. For the best results, the animation files you are importing should have been created using the Source Character or captured using the same marker set used to create the Actor set-up.
Import Options
Before importing animation onto a character it is helpful to understand what import options are available. The Import Options provide different levels of control over how and where the animation data is imported.
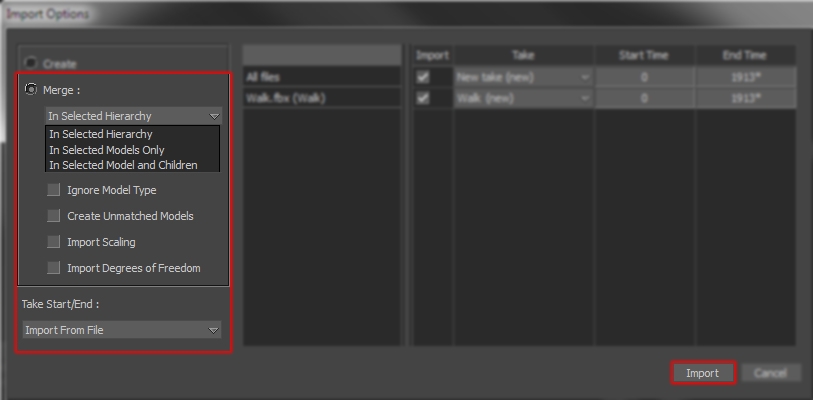
- In Selected Hierarchy – imports the animation onto the entire hierarchy by finding the root node of the selected object. The root node could be the top node of a character skeleton or a set of optical markers.
- In Selected Models Only – imports the animation onto ONLY the objects that are selected. This can be used to avoid importing animation onto objects that may cause conflicts, for instance, joints that are driven by constraints. PLEASE NOTE: for the import to be successful, the selected joints MUST be in a continuous parent child hierarchy e.g. Left Shoulder>Elbow>Wrist NOT Left Shoulder>Wrist)
- In Selected Model and Children – imports animation onto a joint hierarchy, using the selected object as the root of the hierarchy. This can be used to import animation onto a section of the body, for instance the arm, leg, or upper body.
Skeletal Data
- Select Import Objects: Select the objects you want to import the animation onto, using the Options above as a guide.
- Motion File Import… the animation: From the File menu select Motion File Import… and use the Import File browser to navigate to the files you want to import. Left-click the file you want to import or use Shift Left-Click or Ctrl Left-Click to select multiple files from the same folder, and click Open.
- Set Import Options: In theImport Options window set the following options:
- Select where to Import Animation: In the Merge area, select where to import the animation from the Merge drop down menu.
- Deselect Options: In the Merge area, deselect the remaining options.
- Set Take/Start End: From the Take Start/End drop down menu, select Import From File. This sets the start and end time of the take to match the file you are importing.
- Import: Finally, click Import.
Optical Data
- Select the Optical Root. The optical root will appear as a wire frame sphere in the centre of the scene in the Viewer window using “Normal” or “X-Ray” display modes. It is also the root/top node of the optical markers in the Schematic View or the first item in the Opticals branch of the Scene Browser
- Motion File Import…the animation: From the File menu selectMotion File Import… and use theImport File browser to navigate to the animation files you want to import. Left-Click the file you want to import or use Shift Left-Click or Ctrl Left-Click to select multiple files from the same folder, and clickOpen.
- NOTE: for best results, only import animation captured using the same performer and marker configuration as the file used to create the Actor set-up.
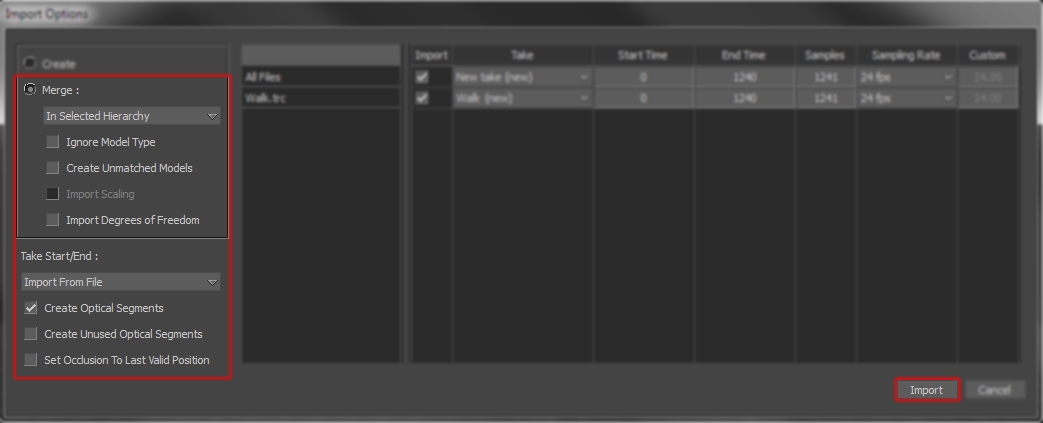
- Set Import Options: In theImport Options window set the following options:
- Merge In Selected Hierarchy. In the Merge area, select In Selected Hierarchy from the Merge drop down menu.
- Deselect Options: In the Merge area, deselect the remaining options.
- Set Take/Start End: From the Take Start/End drop down menu, select Import From File. This sets the start and end time of the take to match the file you are importing.
- Create Optical Segments: In the Custom import options, turn on Create Optical Segments.
- Import: Finally, click Import.
Warnings:
You may get a warning saying that MotionBuilder couldn’t match all the model in the scene. This is usually due to a mismatch between the number of models in the scene and the number of models in the file you are importing. If you are importing skeletal animation created using the “Source” character or optical marker data that has been cleaned and all unidentified markers rectified correctly, this shouldn’t be a problem. You can usually ignore the warning and click Continue. If you are trying to import an animation that WAS NOT created using the “Source” character or data that has not been cleaned and rectified, you will need to open the file separately and check it.
03 RETARGETING SETTINGS
Once the characters have been connected and animation applied to the source character, you can begin refining the various retargeting options. The Character Settings tab has many different options to help refine the retargeting between characters but for now I’m going to describe some of the more common ones. (The full set of retargeting options are available under the Character Settings tab in their respective categories; Retargeting, Offsets, Reach, Stretch, Pull, Stiffness and Modifiers.)
The difference in proportions between the Source character and the Target character will determine how much adjustment the settings will need. The more the characters differ in proportion, and the more interactions the action involves, the more adjustments you may need to make. If you are retargeting from a human performer to a non-human character, you may have to spend some time refining the different retargeting options to get the best possible results. It is worth remembering however, no matter how much refining you do, it is almost impossible to avoid the need to manually edit the animation once it has been plotted to the Target character.
Match Source
PLEASE NOTE: This option only works for Character to Character retargeting NOT Actor to Character
MotionBuilder will calculate the scale difference between the Source character and the Target character (using the Action Space Compensations in the Character Settings>Retargeting options) and adjust the animation accordingly during the retargeting process. For example, if you retarget a walk from a short Source character onto a Tall Target character, MotionBuilder will rescale the animation causing the Target character to walk further than the Source due to its longer legs and greater stride length.
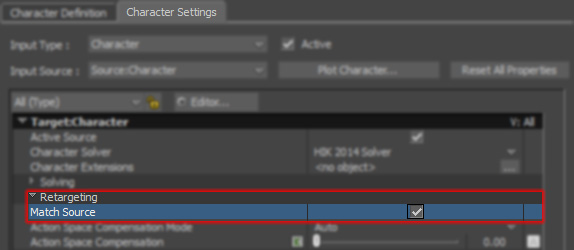
For actions where the target character and source character have different proportions but their body positions and stride length/footsteps need to match exactly; for example, if the character is walking up a set of stairs, “Match Source” will help compensate for the difference in proportions. Match Source (Character Settings>Retargeting>Match Source) adapts the stride length and the position of the Target character to match the Source character. However, the greater the difference in proportions is between the two characters, the less convincingly this will work.
IK Blend T and R
By default MotionBuilder uses FK to retarget animation onto the majority of the Target character limbs, apart from ankles and hips which use IK (IK Blend T/R = 100). These default setting will work pretty well in most situations. The FK retargeting will help maintain the natural curve and twist in the spine and neck, and the bend and swing in the arms. The IK retargeting will help maintain correct body position and foot placement of the hips and ankles.
If an action requires the Target character’s limbs to remain fixed in place, for instance while putting its hands on the floor to get up, activating the IK for the wrist effectors will help maintain a solid contact with the floor (assuming the solid contact is present in the original source data). But using IK to retarget animation can also create over extension/pulling or compression of the Target character’s limbs. To help minimise this, only use IK where necessary by keying the IK Blend values “On” (100.00) and “Off” (0.00) as soon as the Target character’s joints no longer need to remain fixed in place.
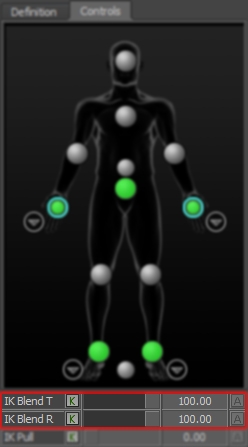
Match Source will affect the way the position of the limbs are calculated when IK Blend is turned on. With Match Source turned off, the position of the Target character’s limbs are calculated relative to the character, in “character space”. This means they may not match the exact world space positon of the corresponding Source character’s limbs. In these situation, for instance when the character is interacting with an environment object, turn match source on. With Match Source turned on, MotionBuilder will try to align the position of the 2 characters limbs in world space using the full body IK control rig to adjust the position of the rest of the body. However, this may create unnatural looking “pull” through the rest of the body, depending on the difference in proportions between the characters. For this kind of interaction you may get better results by manually editing the action after plotting or by creating a custom constraint.
IK Pull
The IK Pull setting spread the “pull” created as the limbs try to reach their IK goal down through the rest of the body. For instance, activating pull on the wrists will share the “pull” down the shoulder and spine. IK Pull can help avoid limb locking or hyperextension in the joints but it can also create other artefacts when adjusting the position of the rest of the body.
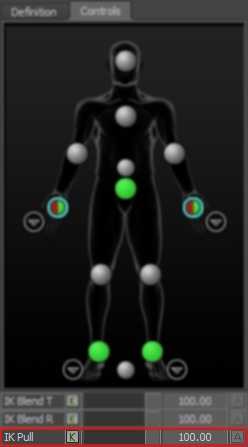
NOTE: The Pull settings are only applied when the IK Blend T value is greater than 0.00.
Floor Contacts
Activating Floor Contacts automatically stops the character’s feet and hands going through the floor. The “floor” can be an object defined during the characterization process or the default global 0 (zero) value in the Y. The floor contact markers for the character’s hands and feet must be aligned accurately for this to work correctly.
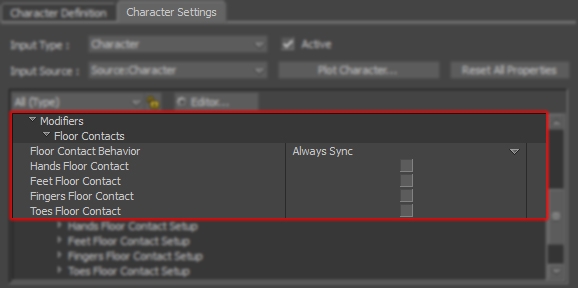
While the Feet Floor Contact modifier can improve the contact between the characters feet and the floor, it can also create other artefacts, for instance, causing the character’s knees to remain constantly bent, giving the character a “squat” appearance. It is always worth comparing the amount of editing work activating the Feet Floor Contact will create versus the amount of editing it will take to manually adjust the floor contacts – or if the feet floor contact is that noticeable at all…
Realigning Animation
During the retargeting process you can change the global position and rotation of the character allowing you to realign the animation in the scene. Simply select the Target character’s Reference node and translate and rotate it into the new position. When you plot the animation to the Target character’s skeleton or Control Rig the new position will be maintained.
Mirroring Animation
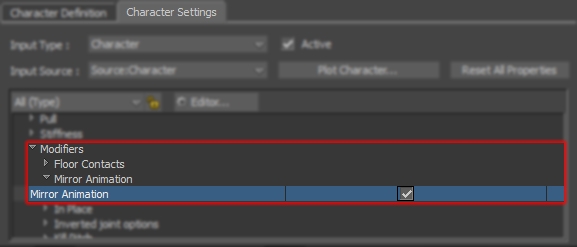
Mirroring an animation creates an exact mirror image of the action on the Target character. This feature can be used to create an alternate variation of an action without the need for additional mocap; for instance, “Wave Left Hand” can be mirrored to create “Wave Right Hand” or “Turn 90 Left” can be mirrored to create a “Turn 90 Right”.
04 PLOT ANIMATION
Once you are happy with the results of the retargeting, it’s time to plot the animation to the Target character. If you are going to edit the action after it is plotted to the Target character, you will need to plot the animation to the Control Rig, otherwise you can plot the animation directly to the character’s skeleton.
…to the Control Rig
- Open Character Settings: Double-click the Target Character in Scene Browser>Characters branch and switch to the Character Setting
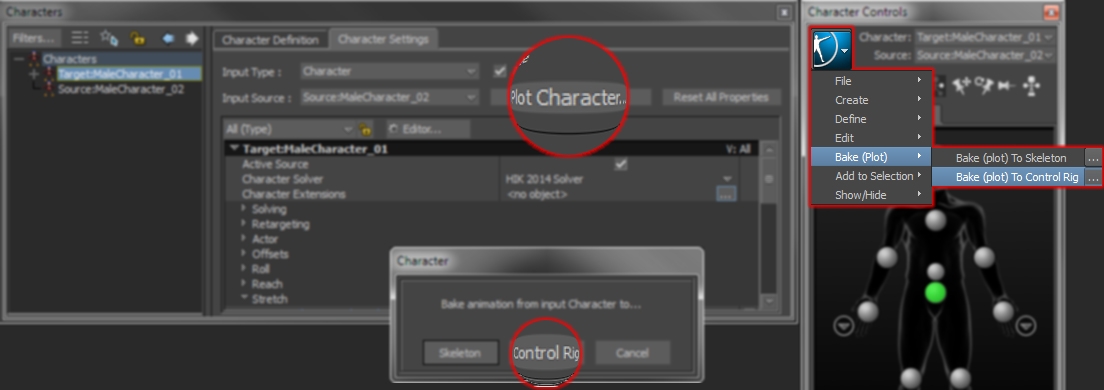
- Plot Character… In the Character Settings tab click Plot Character… and select Control Rig from the Character message window. Alternatively, in the Character Controls window select Bake (Plot) > Bake (plot) To Control Rig from the Character Controls menu button.
- Create Control Rig: If the Target character doesn’t have a Control Rig already attached to, a Create Control Rig window will appear. Simply select FK/IK to create a FK/IK Control Rig.
- Set Plot Options. In the Character pop-up window, set the plot options using description below as a guide.
…to the Skeleton
- Open Character Settings: Double-click the Target Character in Scene Browser>Characters branch and switch to the Character Setting
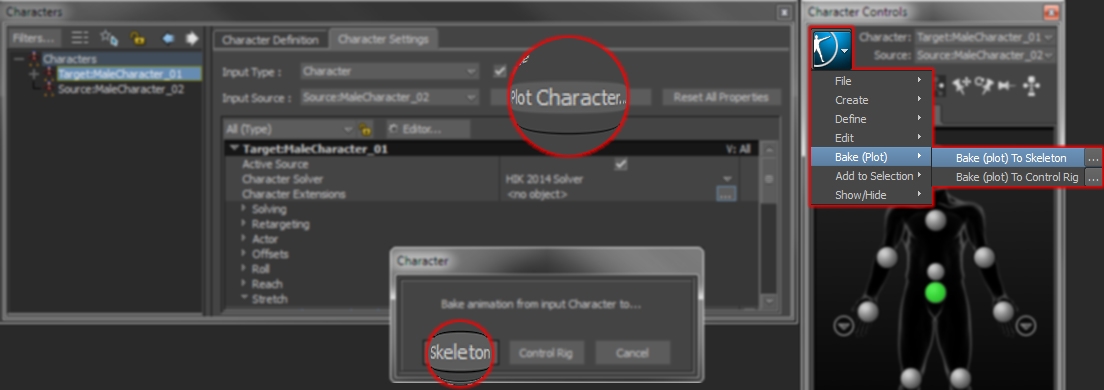
- Plot Character… In the Character Settings tab click Plot Character… and select Skeleton from the Character message window. Alternatively, in the Character Controls window select Bake (Plot) > Bake (plot) To Skeleton from the Character Controls menu button.
- Set Plot Options: In the Character pop-up window, set the plot options using description below as a guide.
…to Specific Objects
- Select Objects. Select individual objects in the Scene browser, Navigator or the Schematic view using Ctrl+Left-click, SpaceBar+Left-click or Left-Click+Drag to select multiple objects, or SpaceBar+Right-click to select an object and all its children. If all the elements are in a namespace, they can selected using Edit>Select By Namespace and selecting the appropriate namespace from the browser.
- Select channels to plot. In the Key Controls window, set the Keying Mode to the correct mode. For example, to plot the Translation and Rotation properties select TR. Alternatively, select the appropriate properties in the FCurves window.

- Plot Selected. In the Key Controls window, select Plot Selected (Selected Properties)… from the Animation menu.
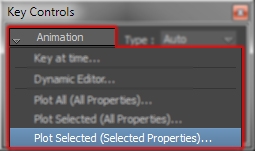
- Set Plot Options. In the Plot Selected Properties pop-up window, set the plot options using description below as a guide.
…on Custom Properties
- Select Objects. Select object with custom properties in the Scene browser, Navigator or the Schematic view using Ctrl+Left-click, SpaceBar+Left-click or Left-Click+Drag to select multiple objects, or SpaceBar+Right-click to select an object and all its children. If all the elements are in a namespace, they can selected using Edit>Select By Namespace and selecting the appropriate namespace from the browser.
- Select Custom Properties to Plot. In the Key Controls window, set the Keying Mode to Selected Properties and select the properties in the Custom Properties section FCurves window.
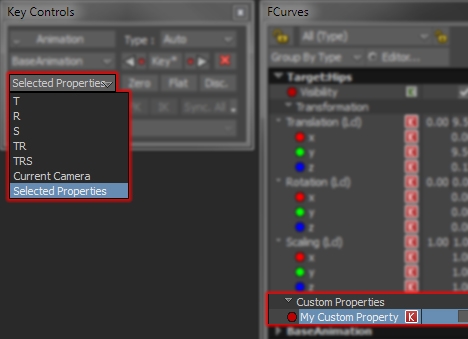
- Plot Selected. In the Key Controls window, select Plot Selected (Selected Properties)… from the Animation menu.
- Set Plot Options. In the Plot Selected Properties pop-up window, set the plot options using description below as a guide.
Plot Properties Window Explained
The following is a brief description of the Plot Properties window to try and explain what each one does.
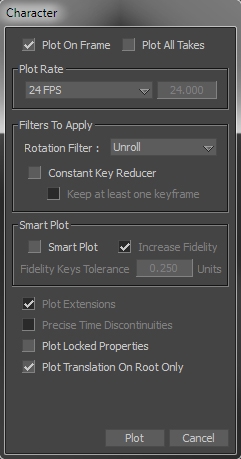
Plot On Frame
Plot On Frame create a key frame on exact frames based on a specified plot rate. For instance, this option could be used to reduce the amount of key frame data by resampling (plotting) the animation at a lower frame rate than it was captured at. If the resampling means the animation no longer starts or ends on an exact frame, plotting starts on the frame before the first frame and ends after the last frame of the take.
Plot All Takes
Plot All Takes lets you plot the animation on all the Takes in the scene using the current settings. Disabling this option will only plot the animation for the current take.
Plot Rate
The Plot Rate menu lets you specify in Frames Per Second (FPS) which frame rate to use when plotting the animation. From the drop down menu select the required FPS or select User FPS to input your own. Please Note: If the animation is plotted at a different frame rate from the scene frame rate, you must update the value in the Transport Controls > Time Format menu so the key frames are displayed correctly.
Filters To Apply
The Filter To Apply menu lets you specify a filtering option when plotting animation. The Unroll Rotation Filter and Constant Key Reducer filters are applied by default.
Rotation Filters
The Rotation Filter menu lets you to select a filtering option to try and correct gimbal locking/flipping in Euler rotations.
- None: No rotation filters will be applied to the rotation curves.
- Gimbal Killer: Tries to compensate for gimbal flips/locks (causing flips or wobbles in the animation) by adding additional sub-key frames to the animation curves.
- Unroll: Tries to compensate for gimbal flips/locks (causing flips or wobbles in the animation) by unrolling the rotations curves and making them continuous.
Constant Key Reducer
The Constant Key Reducer reduces the number of key frames by removing unnecessary key frames on an entire curve, for instance when the object is stationary. Reducing the number of key frames in the scene helps reduces the file size and can also make the data easier to edit.
Keep At Least One Key Frame
If your animation contains key frames that have the same value, the Constant Key Reducer may remove all of those key frames. Enabling Keep at least One key frame will prevent this happening by leaving at least one key frame on the curve.
Smart Plot
The Smart Plot option allows you to plot animation without creating additional key frames and is more relevant when plotting hand keyed animation or merging animation layers with only a few key frames. For instance, when plotting animation that only uses a few of key frames using Smart Plot, the resulting animation will have the same number of key frames, allowing you to continue to edit the original key frames.
Plot Extensions
The Plot Extension option is only available when the Control rig has a Character Extension. Activating the Plot Extensions option will plot the animation on all Character Extensions along with the rest of the character.
Plot Translation on Root Only
Activate the Plot Translation On Root Only to make sure translation data is only plotted to the joint in the Character’s Hips slot.
Suggested Plot Settings
- Plot On Frame = ON
- Plot All Takes = OFF – unless there are multiple take ready to plot
- Plot Rate = Match Transport Controls>Time Format Menu
- Rotation Filter = Unroll
- Constant Key Reducer = OFF
- Smart Plot = OFF
- Plot Locked Properties = OFF
- Plot Translation On Root Only = ON
Check Playback
To make sure everything has plotted correctly, the first step is to check the Target Character still plays back correctly as it is no longer connected to the Source character and any constraints have been turned off. MotionBuilder will automatically deactivate the Source character as the input once the animation has finished plotting.
- Check Characters are Disconnected: In the Navigator window, expand the Characters branch and double-click the Target Character. In the Character Settings tab make sure the Active box is un-ticked.

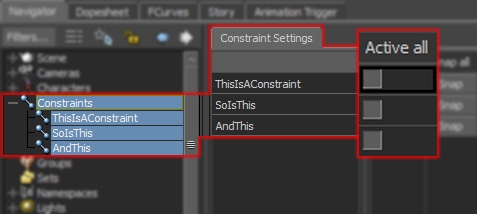
- Deactivate Constraints: In the Navigator window, expand the Constraints branch and double-click the top constraint in the list. Deactivate the constraints by selecting the constraints using Left-Click, Ctrl+Left-Click or Shift+Left-Click and un-check Active or click Active all in the Constraint Settings tab.
- Play Animation: In the Transport Controls, turn on Looping and press the Play to view the animation. If the animation does not playback correctly, you can use the following steps to check if the animation has been plotted correctly or reconnect the Source character and any constraints, and repeat the plotting process.
Check Key Frames
Check all the objects have the required channels plotted as any missing or incorrectly plotted objects may cause the animation import process to fail.
- Select objects. Switch to Schematic View and select the objects using Ctrl+Left-click, SpaceBar+Left-click or Left-Click+Drag to select multiple objects or SpaceBar+Right-click to select an object and all its children. Selection Masks can be used to select specific types of objects, for instance Skeleton joints, by Drag selecting over all the objects in the scene.
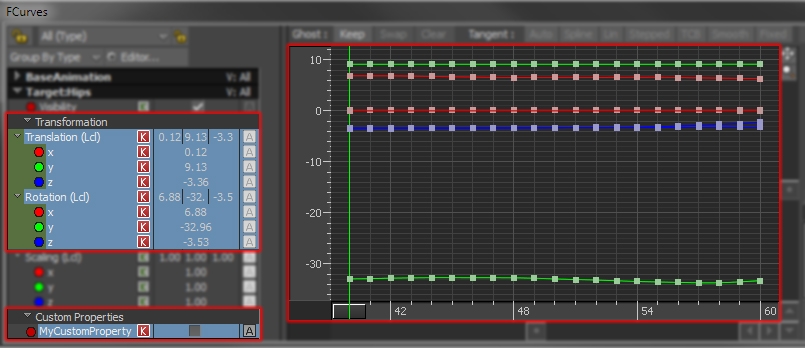
- Check key frames. In the Properties pane of the FCurves window, select the Translation, Rotation and Custom Properties channels and check they have key frames applied to them in the FCurves pane.
Rename Take
Rename the Take if it didn’t have the correct name when it was imported or if it requires updating to something more descriptive.
- Select Take: In the Navigator window, double-click the Takes branch to expand it and open the Take settings window.
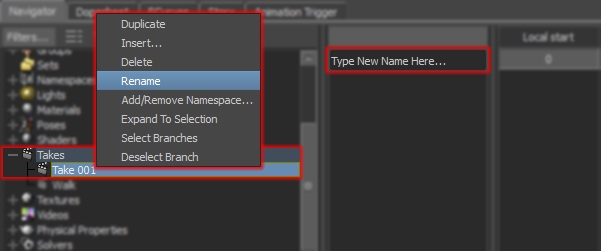
- Rename the Take: Either Right-Click the “Take Name” in the Navigator window and select Rename from the pop-up menu or Double-Click the “Take Name” in Takes settings window and enter the new name. Hit Enter to confirm.
05 REMOVE SOURCE CHARACTER
Save an “Edit” Version
Before removing the Source character or any thing else, it’s a good idea to save an “Edit” version of the file you can return to.
- Save the File: From the File menu select Save As… and use the Save File browser to navigate to a location you want to save the file.
- Set the File Name: Try to use a file name that describes what the file contains. Also consider adding a version number to the file name, for example, “Actor_To_Hero_WalkRemaps_Edit_V001.fbx”.
- Set Save Options: In theSave Option window set the following options:
- Save All Elements: In the Scene section, right-click in the Elements column and select Save All Elements from the pop-up window.
- Save All Animation: In the Scene section, right-click in the Animation column and select Save All Animation from the pop-up menu.
- Transport Settings: In the Settings section, right-click in the Element column and select Save All Settings from the pop-up window.
- Save Takes: In the Takes section, select the individual takes you want to save or Left-Click the Export column title to select all the takes in the file.
- Save: Finally, click Save.
Delete All Source Character Assets
IMPROTANT: CHECK THE ANIMATION HAS PLOTTED CORRECTLY BEFORE DELTEING ANY ASSETS
Once you are sure everything has plotted correctly, you can delete the Source Character and all the assets associated with it.
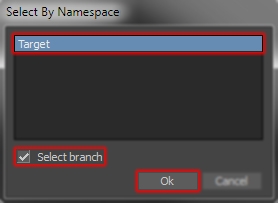
- Select SOURCE Namespace: From the Edit menu choose Select By Namespace… and select the Source character’s namespaces in the Select By Namespace Click Select branch and then Ok. This is why you should add the Source character to a namespace when you first open the file.
- Delete Objects: In theScenes branch of theScene Browser, Right-Click the top node in the “Source” Character’s hierarchy and selectDelete from the pop up menu.Ok any warnings that pop up:
- Ok Delete the selected items(s)?
- Yes to All Delete Constraints Warning
- Delete Character if Character Constraints Found.
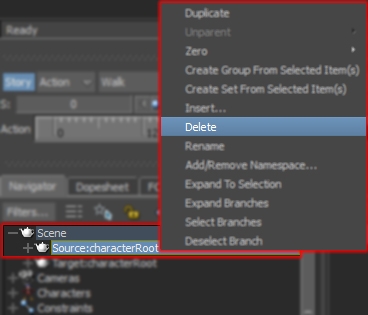
PLEASE NOTE: Using Delete on the keyboard or Edit > Delete may not always delete all the items from the scene.
Delete Constraints
If the constraints for the Target character are no longer required or aren’t supported in the target software, remove them from the scene.
- Select Constraints: In the Navigator window, expand the Constraints branch and select all the constraints to delete using Left-Click, Ctrl+Left-Click or Shift+Left-Click.
- Check Playback. In the Constraint Settings tab, un-tick the Active setting for individual constraints or click Active all with multiple constraint selected. Play the animation back and check the Target character still plays back correctly. If it doesn’t, check the key frames have been plotted correctly or reactive the Sourch character input and repeat the plotting process.
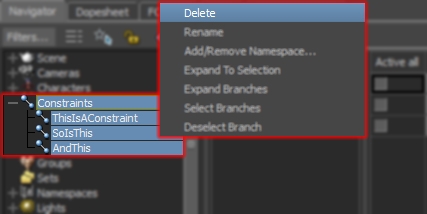
- Delete Constraints: Right-click one of the selected constraints in the Scene browser and select Delete from the pop-up menu.
Delete Control Rig
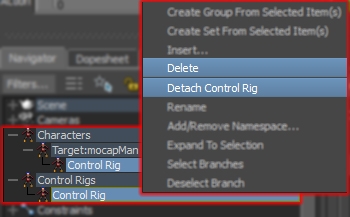
If the animation was edited after the mapping there will be a control rig associated with the Target character. To keep file sizes down and avoid potential problems during import, delete the Control Rig from the scene.
- Detach Control Rig: In the Scene Browser, expand the Control Rigs branch and Right-click the Target character’s Control rig. From the pop-up menu select Detach Control Rig. (If you’re unsure which Control Rig is associated with Target character, expand the Characters branch followed by the Target character branch. The Control Rig connected to the Target character will be displayed here).
- Delete Control Rig: In the Scene Browser, Right-Click the Control Rig again and this time select Delete from the pop-up menu.
Rescale Character
If the Target character was rescaled during the Characterization process, it will need to be returned to the original before importing into your target software – ideally this should be a scale value of 1.
- Select Scale Node: In the Schematic view select the node used to scale the character.
- Check for Key Frames. In the Properties pane of the FCurves window, check the scale channel of the object DOES NOT have any key frames applied to it. If it does, you must delete them or set the value to 1 otherwise any rescaling will not work.
- Rescale to 1: In the Properties tab or Global/Local/Layer fields in Viewer window, type 1 and press Enter.

Remove Namespace
Finally, remove the Namespace from the Target character and its associated assets to help avoid naming conflicts in the target software.
- Select Target Character’s Namespace: From the Edit menu choose Select By Namespace… and click the Target character’s namespaces in the Select By Namespace Click Select branch and then Ok.

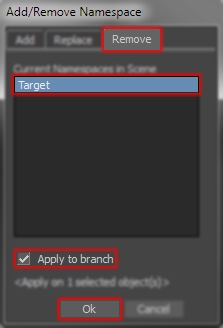
- Remove Target Namespace: From the Edit menu select Add/Remove Namespace… In the Remove tab of the Add/Remove Namespace window, select the Target character’s namespace, click Apply to branch followed by Ok.
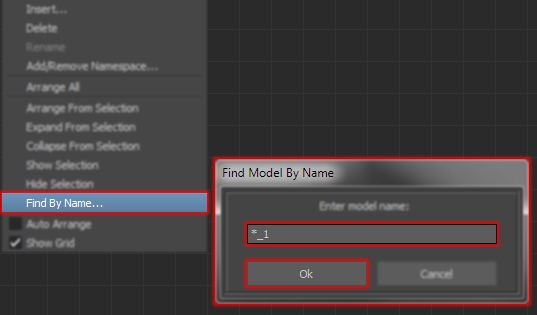
- Check for Naming Conflicts. MotionBuilder will resolve any naming conflicts created when removing the Target character Namespace by adding “_1” to the object name. To check for objects with _1 in the name, switch to Schematic view, Right-Click in the viewer window and select Find By Name… from the pop-up menu or press Shift+n. Type “*_1” in the Enter model name: field and click Ok. This will select all the objects with _1 in the object name.
06 SAVE FILE
Once the retargeting is complete, the animation has been baked/plotted and any unwanted elements removed, the file can be saved. The file can be saved as a FBX file or exported as a BVH file, depending on your final plans.
Saving FBX
- Save the File: Select Save As… from the File menu and use the Save File window to navigate to the folder where you want to save the file. Name the file using the File name:
- Save One Take Per File: If you have multiple takes in the scene, you can save each one into a separate file using theSave One Take Per File check box.
- When using Save One Take Per File, check Use Take Name to rename the resulting file with the name of the take. If this is left unchecked, MotionBuilder will rename the file using <FILE_NAME> – <TAKE_NAME>.fbx naming format.
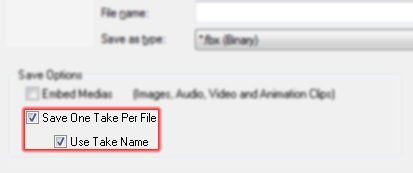
- When using Save One Take Per File, check Use Take Name to rename the resulting file with the name of the take. If this is left unchecked, MotionBuilder will rename the file using <FILE_NAME> – <TAKE_NAME>.fbx naming format.
- Save Everything: In the Save Options window specify which items to save. Unless there is an element in the file you are certain you don’t want include in the save, leave all the assets ticked i.e. Scene Elements, Animation, Settings and Takes and Click Save.
Exporting BVH
- Select Biped Hips: To get the correct export options when exporting a Biped skeleton, you must select the Biped “Hips” joint In the Viewer window BEFORE you begin.
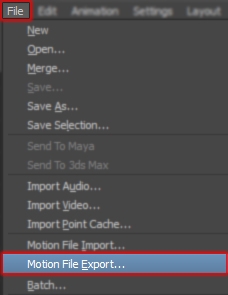
- Export the Motion File: Select Motion File Export… from the File menu and use the Export files window navigate to the folder where you want to export the files. Name the file using the File name: field.

- Set the Export Options: In theExport Options dialog box set the following options:
- Content = Selected Model and Children. This uses the “Hips” joint as a root of the resulting BVH file.
- Existing Files = Ask. This preveVHnts MotionBuilder overwriting existing files when exporting the takes.
- Add Prefix On File Name. This adds the “File name” onto the “Take name” when the file is exported – you can see the resulting file name in the File column of the Export Options
- Check File Name: Check the name of the file you are going to create in the File Column of the Export Options To change the name, double click the file name in the File column and type a new one.
- Export: Once the file name is correct, click Export.

Thanks for this step by step guide, I really needed it for the 3d animation purpose.
Thanks for the comment.
It’s so good to hear it helped!
Great tutorial, actually your whole site is an excellent resource.
Thanks, Boris. Appreciate it.
Very useful!
Thank you!