In this motionbuilder tutorial I will take you through the processes involved in preparing and exporting your character into motionbuilder and then importing your lovingly crafted animation back on to your character. Because of the many different possible combination of plug-ins and software versions I will try to make this tutorial as generic as I can while still covering all the essentials. The only downside to this may mean you have to search online or test different plug-in settings to get the desired results with your particular combination of software and plug-in.
So excuses and apologies out of the way, let us begin
The main topics covered in this tutorial are:
- Building a Skeleton for MotionBuilder
- Importing a Character into MotionBuilder
- Exporting animation from MotionBuilder
- Importing an FBX File
Building a Skeleton for MotionBuilder
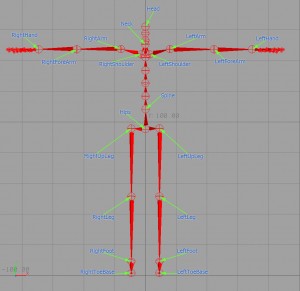
- Create a skeleton. The first thing you will need to do is create a continuous FK skeleton hierarchy for you character if you haven’t already done so. It is possible to have a complex skeleton with auxiliary joints to help with skinning and deformations, but the main joints of your character will need to be in a continuous parent child hierarchy.
- Align rotational axis. I’m not going to go over the principals of building a skeleton for your character, there are lots of good tutorials online about how to do this. The one thing I would recommend is that you have one of the joints rotational axis aligned down the joint. This will make your animation curves much easier to read and edit in an fcurve editor as you won’t be dealing with compound rotations. It will also create smaller files when exporting to a game engine for instance, as you won’t have unnecessary data on joints like the knees and elbows that only rotate in one axis. The cleaner you build your skeleton the easier it will be to work with and fault find should you run in to problems.
- Joint Naming. MotionBuilder does require a specific naming convention if you want to use the “drag and drop” Characterization on your character. However, it is possible to use your own naming convention for joints if you want or need to, it will just require a little more work to Characterize your character once you have it in MotionBuilder. Also once you have characterized one character with your own unique naming convention it is possible to extract that naming template and use the Character it creates to drag and drop on to any other character with the same joint names.
- Required Joints. For the Characterization process to work inside MotionBuilder your skeleton must contain at least the “Base” set of joints listed below.
- Hips
- LeftUpLeg
- LeftLeg
- LeftFoot
- RightUpLeg
- RightLeg
- RightFoot
- Spine
- LeftArm
- LeftForeArm
- LeftHand
- RightArm
- RightForeArm
- RightHand
- Head
- Remaining Joints. Beside the required “Base” joints listed above the Character Rig also supports:
- Auxiliary Joints – For single toes, shoulders, neck and single fingers
- Spine Joints – Up to 9 spine joints are supported
- Roll Bones – Currently only one roll bone per limb is supported.
- Left and Right Hands – For Fingers
- Left and Right Foot – For toes
- Left and Right In-Hand – For the joints in the hands
- Left and Right In-Foot – For the joints in the feet
- Neck – Currently supports up to 9 neck joints
- Skin the character. Before you skin your character delete the history from the mesh or collapse the stack as this information will not be exported to MotionBuilder. You can skin your character using rigid or smooth skinning as both are supported by the exporter. If you have any extra rigid geometry for things like eyes, teeth or finger nails these can simply be parented the appropriate joints for export.
- Align the Character. For the characterization process to be successful in MotionBuilder your character must be aligned in a T-Pose facing down positive Z. MotionBuilder relies on the character begin positioned in this way to set-up things like the full body IK and the offsets when mapping animation between different characters.The character’s arms, legs, fingers and toes should be positioned so the mesh, not necessarily the bones, appears perfectly straight. (Sometime straightening the bones can cause the characters limbs to appear bent in an unnatural manner). Once the character is in the T-Pose you can rotate it to face down positive Z.
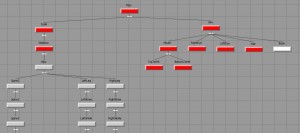
- Group character elements under a single node. It can be useful to group all the separate elements of your character under one node. I group any separate mesh elements under one node and all the skeleton nodes under another. The skeleton group node can then be used as the “Reference” in the Character Definitions Tab when characterizing your character. I also group the skeleton group under a “Scale” node so I can easily change the scale of the character in MotionBuilder if necessary. I then group the “Scale” node and mesh nodes under one last group so all the elements of the character sit neatly under one group. This makes it much easier to identify and select everything that belongs to the character in a scene.
- Save a clean file. Once I have finished the character set-up I save a “clean” version of the file to use for importing animation back from MotionBuilder. This means anything that cannot be exported to MotionBuilder is preserved in the scene and I only have to import animation on to the character which is much faster than importing an entire scene.
- Export as fbx. Because the plug-ins vary quite a bit between the different version of MotionBuilder and Maya/Max it is worth going on line and finding out exactly what objects the version of the exporter you are using supports. You should also find an explanation about what each of the different options in the exporter actually does. The early ones were pretty simple and only asked if you wanted to export animation and geometry. The more recent plug-ins now support more items and will require a little more investigation. As a basic guide the more recent plug-ins should support:
- Smooth and Rigid skinning
- Polygons and Nurbs surfaces without history
- Any UV sets and Multiple Shaders on geometry
- Simple shaders.
- Basic constraints
- Blend shapes ( Include the target shapes when exporting and only have one shape per channel).
- Test the Pipeline. Once you have your character in MotionBuilder create some key frames on it and import the resulting file back on to your character to make sure everything is working as expected. It’s better to find any problems at this stage before you start creating lots of animation and then find you have to start changing the rig and remapping animations.
- Blend Shapes. If you are exporting Blend shapes to MotionBuilder for facial animation the target shapes must be in scene when exporting. These will not be visible when you open your scene in MotionBuilder, but they are required for the export process. Also the blend shapes can only contain one target per channel. In-line or progressive are not supported.
- Constraints. The more recent versions of the fbx exporter does support basic constraints. IK, Point, Rotation and Parent constraints can all be exported in to MotionBuilder. More complex constraints like Expression are not supported by the exporter, but they will still work if you only import the animation from a completed MotionBuilder file on to your character. Importing the animation on to your character apply the animation to the main joints while maintaining any expression constraints in your scene.
- File>Import your character in to MotionBuilder. If you are using MotionBuilder 2009 or above you will need to use File>FBX Plug-in Import… or File>FBX Plug-in Merge… to import your character. Pre MotionBuilder 2009 use the File>Import or File>Merge options. File>Import only allows you to specify which animations are imported, while File>Merge allows much more control over exactly what is merged in to the scene.
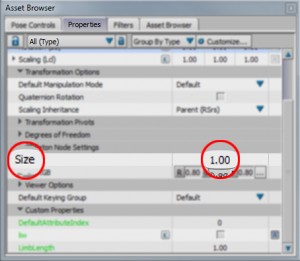
- Re-size joint display size. The display size of the joints may require adjusting once you have imported your character in to MotionBuilder. In the Asset Browser>>Properties>>Skeleton Node Settings>>Size change the value until the bones appear the right size. This only affects the display size of the joints and will not affect the actual joint size or scale.
- Scale the character. It may be necessary to re-scale your character due to different unit scales or to match the size of a performer when re-targeting data. If you created the “Scale” node before exporting your character you can use this or you can create a null, parent the skeleton to it and apply a scale to the null object.
- Align the character. If you haven’t already aligned your character as described above, do so now.
- Characterize the character. Now you have your character in MotionBuilder it can be characterized using this handy tutorial.
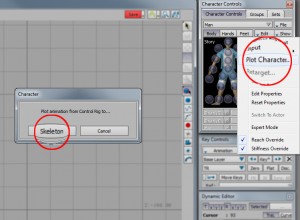
- Plot the animation to the Skeleton. In the Character Controls window click Edit>Plot Character… and click Skeleton from the pop-up window.
- Plot any animated or constrained objects. Select all the objects you have animated or that have constraints attached to them and plot the animation to them. In the Key Controls window set the channels you want to plot from the Keying Mode drop down. Click Animation and from the drop down menu select Plot Selected (Selected Proerties)… to plot the animation to the objects you selected on the channels you chose.
- Re-Scale the character. If you changed the scale of your character after it was imported, you will need to return it back to it’s original size be resetting the value on the Scale node.
- Save the scene. Using File>>Save As… save the completed scene as a .fbx file ready to be imported on to your character. It can be useful to keep a separate “MoBuImport” folder containing your completed files ready for importing
- Import the file. MotionBuilder files can be imported on to your “Clean” character file or in to an empty scene, using the importer to re-create all the objects from the fbx file.
- Plug-in Settings. Depending on which version of 3D software you are using and which version of the plug-in you have, the import options can vary greatly, so here a general general guide on what options to use:
- Turn on Animation – Without this the animation won’t be imported
- Animation Take: This drop down list will be populated with all the takes saved in the fbx file. Simply select the one you want to import.
- Fill Timeline – This will set the correct start and end time in your scene for the take you are importing.
- Set File content: Update scene elements/Exclusive merge will import just the animation from the fbx file on to objects with the same names as those in your current scene. This option can be used to import animation on to your clean character.
- Set File content: Add to scene will add the entire contents of the fbx file to your current scene including animation geometry and anything else supported by the importer plugin you are using.
- Protect driven keys. Activating this will prevent the plug-in applying animation to any joints which use set driven keys or expressions
Importing a character into MotionBuilder
Exporting animation from MotionBuilder
Importing an FBX File
So there you have it, how to prepare, export and import your character into MotionBuilder. As with any of the tutorials, please add your own comments on different work flows or let me know if any of this isn’t making sense.


Leave a Reply