Creating a Custom Character or Skeleton Definition File allows you to use your own custom bone names and still automatically characterize characters.
Once a character has been manually characterized, a “Custom Character Asset” or “Skeleton Definition File” can be created. These assets provide the same automatic characterization functionality as the default MotionBuilder Character asset but without the need to use the default MotionBuilder bone names.
PLEASE NOTE: The following work-flow requires the manual completion of the Character Mapping process BEFORE you continue.
Custom Characters
Creating a Custom Character asset
The first method creates a custom Character asset by extracting a Naming Template from a characterized character. MotionBuilder can then use this list of bone names to identify other skeletons and automatically characterize your character. Does not include name-spaces.
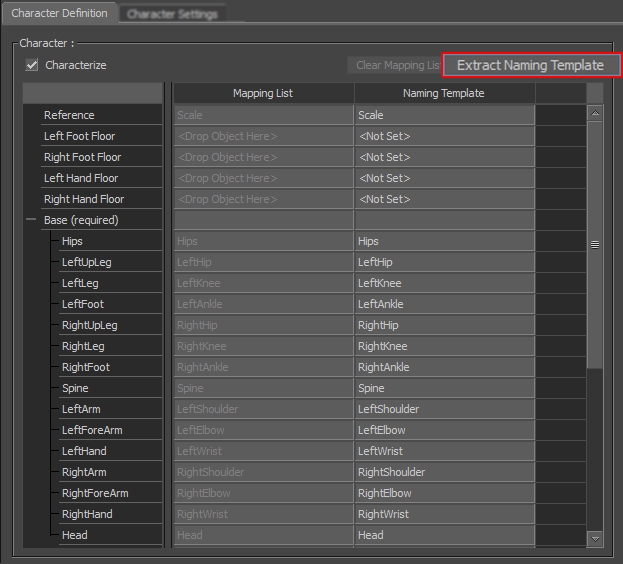
- Extract a Naming Template. In the Character Definitions tab click Extract Naming Template and then OK in the Create Naming Template pop-up click OK to update the current naming template. This populates the Naming Template column with the bone names of your character.
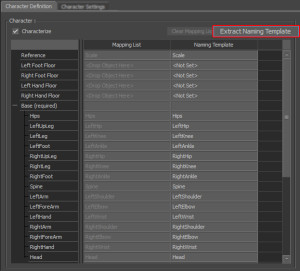
Extract Naming Template
- Save the Custom Character. Once you have extracted the Naming Template, save the character asset into a separate file. Select the custom character in Navigator>Characters window and choose Save Selection from the File menu.
- Discard everything except Characters. In the Save Selection Option window, right-click in the Element column and select Discard All Elements from the menu. Right-click in the Animation column and select Discard All Animation from the menu. Left click Export in the Takes area to deselect all the Takes. Left-click in the Element column next to the Characters group to select it – you should see a disk. Finally click Save
Using Custom Characters
There are 2 ways to use the custom character; drag-and-drop characterization automatically characterizes your character in the same way as a default MotionBuilder Character asset. Drag-and-drop Character Mapping automatically completes the Character Mapping process without activating the Characterize option.
- Open a Character File – File>Open the character rig you want to characterize. This character should use the same bone names as the custom character you created in the previous step but it can have a different namespace.
- Merge the Custom Character. File>Merge the custom character into the scene. In the Merge Options window Discard All Elements, apart from the Characters element, and Discard All Animation and Takes to make sure only the Character asset is merged into the scene.
Drag and drop Characterization
- Drag and drop Custom Character – Drag the custom Character from the Navigator>Character tab onto a bone in the character hierarchy. If the bone names in the new character match those in the custom character’s Naming Template, MotionBuilder will complete the Character Mapping process.
- Characterize – If the previous step was successful, click Characterize in the pop-up menu to active the Characterize option.
- Choose character type – To complete the process, select the type of character to characterize from the pop-up window and MotionBuilder will characterize your character.
Drag and drop Character Mapping
- Select Character Hierarchy – Select the entire hierarchy of you character using Ctrl+Shift+Right-click on any part of your character.
- Add to Mapping List – Using Alt+Left-Click, drag the selected bones from the viewer window into the Character Definition>Mapping list. MotionBuilder will then use the bone names in the Naming Template to complete the Mapping List.
- Characterize – If the Mapping List has been completed correctly, activate the characterize option and choose the type of character to characterize.
Skeleton Definition Files
Creating a Skeleton Definition File
The second approach is to create a Skeleton Definition File using the bone names in the Naming Template column which can be used to automatically complete the Character Mapping Process. The skeleton definition file has the added advantage of allowing you to further customise the bone naming with a prefix, for instance <CHARATER_NAME_>, and still recognise the required bone name. This Skeleton Definition file can then be used to automatically populate the Mapping column for other characters that have the same bone naming convention.
- Extract a Naming Template. In the Character Definitions tab click Extract Naming Template and then OK in the Create Naming Template pop-up click OK to update the current naming template. This populates the Naming Template column with the bone names of your character.
Extract Naming Template
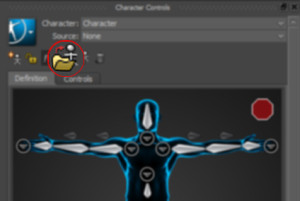
- Save Skeleton Definition… In the Character Controls>Definition window click “Save Skeleton Definition…” to open the Save Skeleton Definition Window.
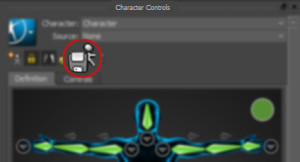
Save Skeleton Definition File
- Enter Template Name – In the Template Name field enter a name for the skeleton template you’re about to create.
- Enter Prefix – In the Prefix filed enter the text to remove from the beginning of the bone names, for instance the character name-space, including the ‘:’, or any prefix to the bone names.

Save Definition File
- Save – Save the template file by clicking OK.

Using a Skeleton Definition File
There are two ways to apply a Skeleton Definition File to the bones in a hierarchy: Match all bones with a prefix or Match only selected bones.
To Match all bones with a prefix:
- Select a bone – Select any bone in the character hierarchy.
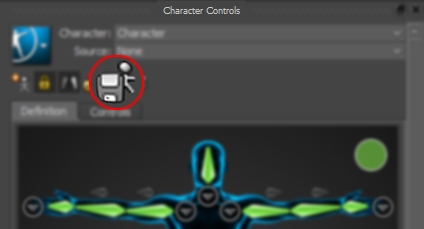
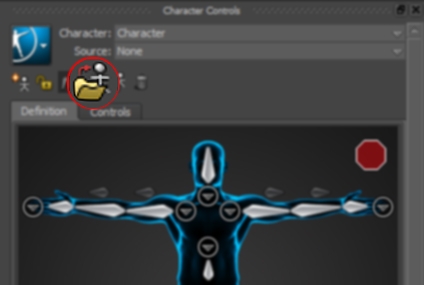
- Load Skeleton Definition File – In the Character Controls window click the Load Skeleton Definition… button to open the Load Skeleton Definition File window.
Load Skeleton Definition
- Select Template – In the Load Skeleton Template window select the Template that contains the bone names of your character from the drop down list.
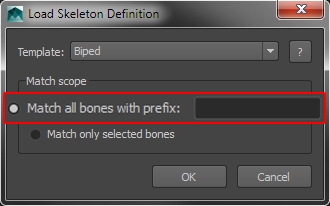
- Match all bones with a prefix – Select the “Match all bones with a prefix” radio button and type the bone name prefix in the field provided. For example, this could be the character namespace, including the colon (:) or a <CHARATER_NAME_> if it is included in the bone name.
- Click OK.

Match all joints with a prefix
To Match only selected bones:
- Select bones to match – Select ONLY the bones you want to be included in the Character Mapping List.
- Load Skeleton Definition File – In the Character Controls window click the Load Skeleton Definition… button to open the Load Skeleton Definition File window.
Load Skeleton Definition
- Select Template – In the Load Skeleton Template window select the Template that contains the bone names of your character from the drop down list.
- Match only selected bones – click the “Match only selected bones” radio button
- Click OK.
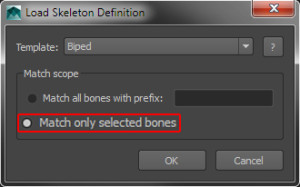
Match only selected bones

If the process has been successful, MotionBuilder will automatically populate the Mapping List with the corresponding bones from your character. If the Mapping List has been completed correctly, activate the Characterize option and choose the type of character to characterize.
Leave a Reply