In this tutorial you will learn how to successfully characterize a 3DS Max Biped character in MotionBuilder.
Before you can begin using the character animation features in MotionBuilder you will need to characterize your Biped. The process involves 3 main steps:
- T-Posing – This is the most import part of the process and requires accurate alignment of your Biped’s limbs.
- Character Mapping – Completing the “Mapping List” defines the Biped’s hierarchy so MotionBuilder can understand it.
- Characterize – The easy bit! Once the Characterize box is ticked, MotionBuilder will recognises the Biped as a character that can be animated using the Control rig, Actor asset, or other characters.
T-Posing
Correctly aligning the Biped in a T-Pose is possibly the most important part of the whole characterization process. When you active the Characterize option, MotionBuilder uses the position of the Biped at that moment as the start pose for any animation, remapping or poses you do. Any errors at this stage will seriously affect the amount of editing work you have to do later so it’s worth spending a bit of time to make sure all the joints are aligned as accurately as possible. To help with accuracy, try to use a skinned Biped rather than just a skeleton. The mesh will make it much easier to see if the joints are aligned correctly especially on the fingers and feet.
- Centre the Biped – Select the root of the Biped skeleton, usually the hips, and translate it globally along the X and Z axes into the centre of the scene. Adjust the height of the Biped, moving it in Y, if the character’s feet are not flat on the floor. With the root of the Biped still selected, globally rotate it in Y until it is facing down the positive Z axis. You can quickly check the alignment in the Front orthographic view (Ctrl+f); the Biped should be looking directly at you.
- Straighten the arms globally – Globally rotate the joints in the arms so the arm and hand MESH, not necessarily the joints, appear straight and parallel to the ground.

Globally Straighten the Arms
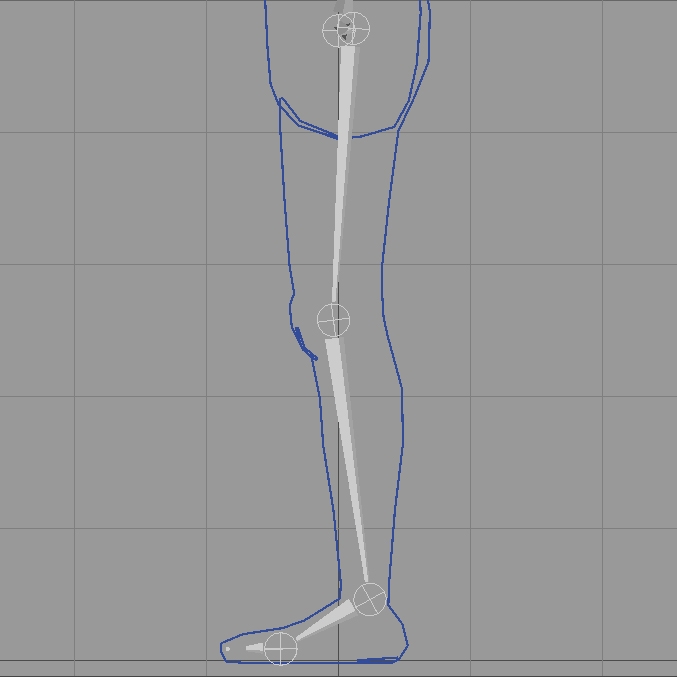
- Straighten legs globally – Using the same process as you did for the arms, align the joints in the leg so the leg mesh appears vertial, the knees are straight and the feet are flat on the floor and pointing forwards. If you need to rotate the legs, don’t forget to to adjust the height of the character’s root node – Y value – to realign the feet back onto the floor.

Globally Straighten the Legs
- Straighten fingers globally – Repeat the process again with the finger joints making sure they are parallel to the ground and not spread apart or twisted.
- Straighten the spine, neck and head – As with the other joints, the spine, neck and head should be rotated so the your character appears to be standing upright with a straigh back, and looking straight ahead.

Character Mapping
Before you can begin animating the Biped in MotionBuilder, you must define it’s hierarchy using the character Mapping List so MotionBuilder understands which joints are the legs, arms, head, etc. This process is called Character Mapping. The Mapping List creates a link between the joints in the Biped and a set of predefined nodes that exist in all characterized characters inside MotionBuilder. These nodes are used to build the Control Rig when animating, remap animation between characters, and retarget motion capture from the Actor asset.
There are 2 ways to complete the character Mapping Process for a Biped character: Automatic and Manual. Automatically completing the Mapping List using a Skeleton Definition Template can only be completed successfully if you have NOT changed the joint names of your Biped (changing the name of your Biped is OK). If you have chosen to rename the Biped joints, you will need to manually add each joint to the Mapping list. Once the mapping list has been completed manually, it is possible to create a “custom character” or “Skeleton Template” file which can be used to automatically complete the Mapping List for other Bipeds that use the same joint naming convention.
Using a Skeleton Definition File
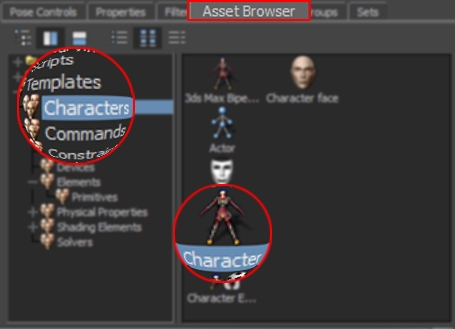
- Drag a Character asset into the scene – From the Asset Browser>Templates>Characters window drag a Character asset into the Viewer window to add it to your scene.

Character Asset
- Select Biped Joint – In the Viewer window select any joint in the Biped character.
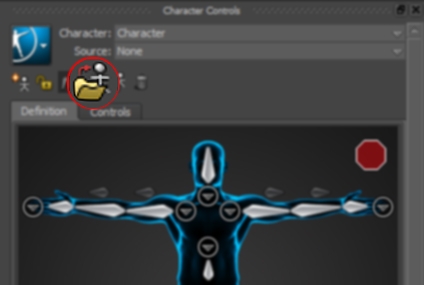
- Load Skeleton Definition – In Character Controls>Definition tab click Load Skeleton Definition to open the Load Skeleton Definition dialogue window.

Load Skeleton Definition
- Apply Biped Template. In the Load Skeleton Definition dialogue box set Template = Biped and the Match Scope = <BIPED_NAME> and click OK.
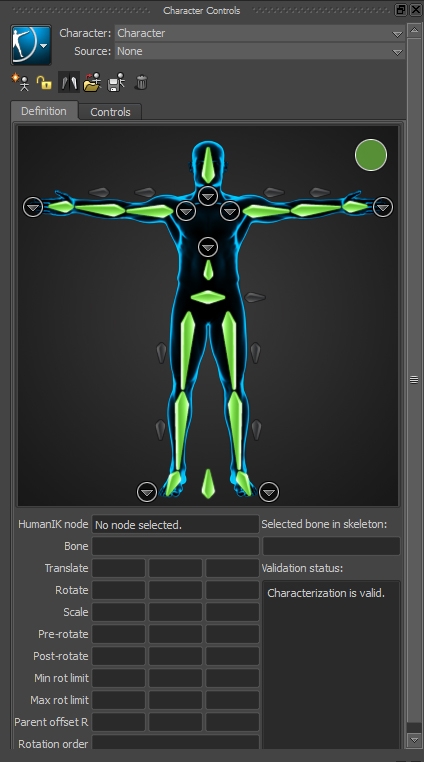
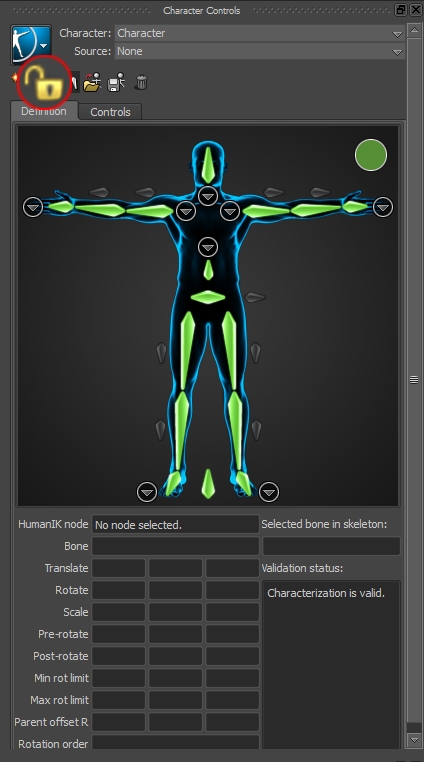
- Check Characterization is Valid – Before you characterize the Biped, check the Skeleton Definition file has completed the Mapping List correctly and the characterization is valid – the red hexagon at the top of the definition tab will change to a green circle. Any joints that are invalid will be coloured yellow. Clicking on them will display the error in Validation Status section of the Definition tab.

Mapping Valid
Manual Character Mapping
If you have used your own custom joint names and need to complete the list manually, the Manual Character Mapping section of this post will explain how to do it.
Characterize
Once you have completed the Mapping List you can activate the defined character map to “Characterize” the Biped. MotionBuilder will then recognise it as a Character that can be animated with a Control-Rig, Actor asset or another character. When you characterize a Biped, MotionBuilder uses the structure you have defined in the Mapping List and the Biped’s current position as the start pose for any animation, remapping or poses you create; this is why it is very important to align the T-Pose as accurately as possible.
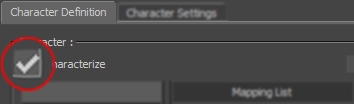
- Characterize the character – Once you have completed the Mapping List; check the Biped is facing down the +z axis and standing in a T-pose. If everything is correct, active the characterize option in the Character Definition tab by clicking the Characterize box or the Lock Character button in Character Controls>Definition window.
Lock Character

Characterize
- Adjusting the Floor Contact Markers – Once the characterization is complete, set up the feet and hand floor contact points if you intend to use automatic floor contacts. Make sure Floor Contacts is active in the Character Controls>Show window. Using a side orthographic view, translates the markers to the heel, ball and end of the toes of the Biped, and use the front view to set the width of the markers under the Biped’s feet.
- Rename the character – To make the character easy to identify and also avoid naming conflicts, rename it to something more appropriate (e.g. the current name of the Biped). To rename the character asset, expand the Characters branch in the Navigator>Scene Browser window and right click on the newly created “Character” and select Rename from the pop-up menu. Type the new name in the text box provided and hit Enter. If you have namespaces other character elements, don’t forget to add the Character element to the same namespace.
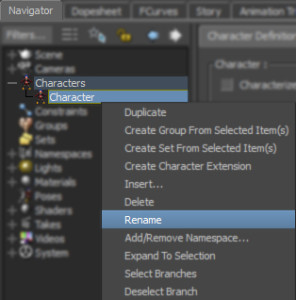
Rename Character
Editing a characterized character
It is possible to edit the Biped once it has been characterised if you find it isn’t working as you expect.
- Return Biped to T-Pose – Put the Biped back in a T-Pose by setting Characters Input Type : Stance using the Character Settings tab or the Character Controls Source. This returns the Biped to the original T-pose you used to characterize it.

Character Input Type:Stance
- Deactivate the characterize option – Deactivating the Characterize option in the Character Definition tab or “unlocking” the character in the Character Controls window, allows you to edit the joint assignment in the Mapping List and tweak the position of the Biped’s joints.

Leave a Reply