This simple 10 step tutorial will show you how to build a skeleton and prepare it for use in MotionBuilder.
Building a skeleton for MotionBuilder or motion capture is the same as building a skeleton for any other purpose, apart from you don’t need to rig the skeleton to animate it as MotionBuiler uses it’s own internal rig and motion capture software usually has it’s own system to solve or animate a skeleton using the marker data.
1. Create a skeleton hierarchy.
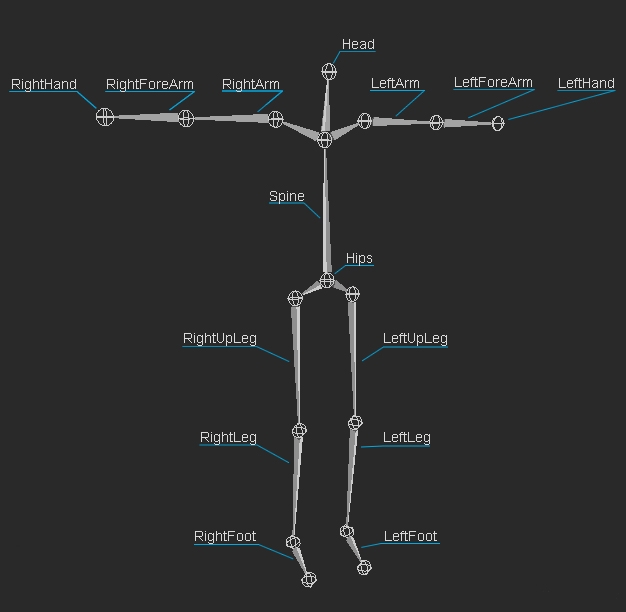
The first thing you will need to do is create a continuous FK joint hierarchy. As with all character rigs, the cleaner you build your joints hierarchy, the easier it will be to work with and the easier it will be to diagnose any faults you encounter. Try to avoid building your character very small or very big as this can cause accuracy errors with the solvers. To ensure your character is compitable with the Character tool inside MotionBuilder, it must contain at least the “Base” set of joints.

Required “Base” Joints
2. Rename the joints
Once you have built your joint hierarchy, rename the joint to something more descriptive; for instance using the MotionBuilder naming convention: “LeftUpLeg|LeftLeg|LeftFoot” or use real-world joint names “LeftHip|LeftKnee|LeftAnkle”. Although MotionBuilder does require a specific joint naming convention if you want to use the automatic “drag-and-drop” Characterization, it is possible to create your own custom joint naming template to automatically characterize your characters once you have manually characterized the first one.
3. Set Joint Orients
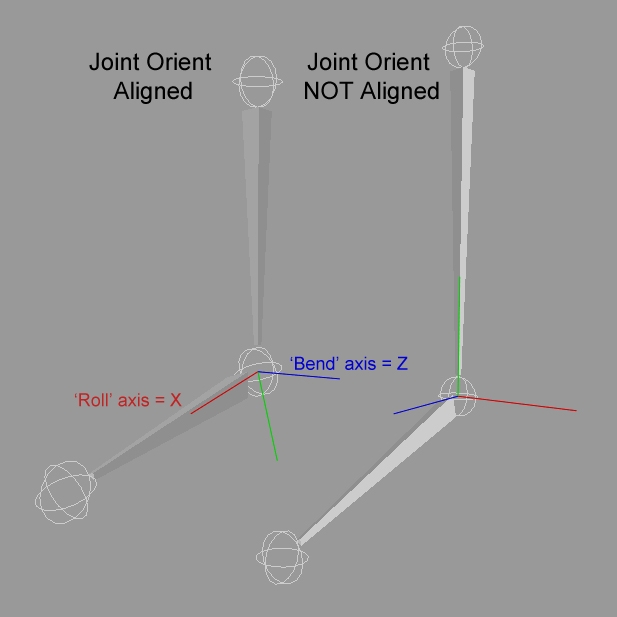
Align one of the rotational axis down the joint, for instance the “X” axis, as this will make your animation curves much easier to read and understand, and enable you to perform simple edits quickly. MotionBuilder also prefers the rotational axis aligned in this way so the joint can rotate, or twist, along that axis.

Aligning Joint Orients
4. Set Rotation Order
Setting the correct Rotation Order of a joint can help avoid gimbal locks. Although MotionBuilder has tools to deal with gimbal locks, these often “hide” the lock or flip at a sub frame level. While this enables the animation to playback correctly, it may produce unexpected results if you need to use anything at the sub-frame level like rescaling the animation or motion blur. Unfortunately there isn’t a “one-solution-fits-all” setting for this. To determine the best rotation order you will need to test the different situations the joint might encounter and decide which order will create the least amount of issues. As a basic guide to setting the rotation order:
- The first axis should be where you expect the majority of the rotation to occur as this is the one that won’t end up a gimbal (often used as the “roll” or “twist” axis)
- The second axis should where you expect the least amount of rotation to occur as this axis is more likely encounter gimbal lock.
- The final axis should do the second largest amount of rotating as this is less likely to encounter gimbal lock.
5. Set Degrees Of Freedom (DOF)
If you plan to set the DOF on the elbow or knee joints, MotionBuilder recommends the free axis is listed last in the chosen Rotation Order, and that the axis is aligned to the actual “bend” axis of the joint. If you plan to limit the DOF for the roll axis (the axis aligned down the joint) on the elbow or knee, it is recommended you remove the DOF for all three axes on the wrist and ankle joints or include a roll joint in your hierarchy so the limbs can reach their goals and solve correctly.
6. Remove Complex Constraints
Complex constraints driving additional “helper” joints may not export and work correctly inside MotionBuillder. In these cases it is best to create a “mocap” version of the skeleton by removing these joint set-ups and fixing the skin weights. The “mocap” version of the skeleton can then be exported for use in MotionBuilder, and the resulting data can be imported back onto the original skeleton where the constraingt can continue to drive the helper joints. The FBX plug-in supports following constraints:
- Point
- Aim
- Orient
- Parent
- IK handle (including Pole Vector)
7. Skin the character
Before you skin your character, freeze the transforms and delete any non-deformer history from the mesh. The character can then be skinned using rigid or smooth skinning, as both are supported in MotionBuilder. Any additional rigid geometry, like hair for example, can be parented to the appropriate joint.
8. Group character elements
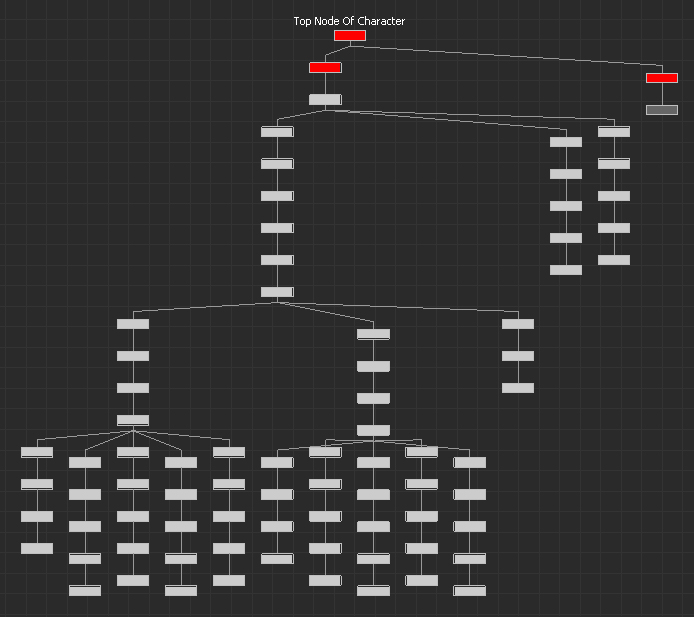
It’s helpful to group all the individual elements of a character into a single hierarchy so you can easily identify them in your scene. Beign by parenting the individual geometry elements under one “Mesh” node and all the individual joint elements under a “Skeleton” node (which can also be used to re-scale the character in MotionBuilder if necessary) Finally group the “Skeleton” node and “Mesh” node under one final “Character” node so all the elements of the character are arranged neatly in a single hierarchy.

Complete Character Hierarchy
9. Using Blend Shapes
If you are exporting Blend shapes to MotionBuilder for facial aniamtion, the target shapes can only contain one target per channel and must be present in the scene when you export the character to MotionBuilder, although they will not be visible when you open your scene in MotionBuilder.
10. Exporting an FBX
The entire scene can be exported as an FBX file using the File>Export menu and setting file type to “FBX”. As plug-ins vary between the different version Maya and Max, you will need to search the “Help” docs for “fbx exporter” to see what export options and elements are supported by the plug-in you are using. You can export all the textures assigned to your character by turning on the “Embed Media” option in the exporter. This will create a FBM folder containing all the textures in the same location as the FBX file you export. When you open your character in MotionBuilder, any missing or incompatible textures will be displayed as grey with a blue question mark.
IMPORTANT
Finalise the joint names and most importantly the joint positions of your character BEFORE you begin processing any mocap data with it. Any difference between the joint names, or more critically the joint positions, of the character in MotionBuilder and the rig you are importing the data on to will cause the importer to fail or severely compromise the final quality of the mocap data. As soon as you have your character set-up in MotionBuilder, export some test data back onto your target character to check the character pipeline is working correctly.
MotionBuilder Skeleton Naming Convention
- Base (required)
- Hips
- LeftUpLeg
- LeftLeg
- LeftFoot
- RightUpLeg
- RightLeg
- RightFoot
- Spine
- LeftArm
- LeftForeArm
- LeftHand
- RightArm
- RightForeArm
- RightHand
- Head
- Auxiliary
- LeftToeBase
- RightToeBase
- LeftShoulder
- RightShoulder
- Neck
- LeftFingerBase
- RightFingerBase
- Spine
- Spine1
- Spine2
- Spine3
- Spine4
- Spine5
- Spine6
- Spine7
- Spine8
- Spine9
- Neck
- Neck1
- Neck2
- Neck3
- Neck4
- Neck5
- Neck6
- Neck7
- Neck8
- Neck9
- Left Fingers
- LeftHandThumb1
- LeftHandThumb2
- LeftHandThumb3
- LeftHandThumb4
- LeftHandIndex1
- LeftHandIndex2
- LeftHandIndex3
- LeftHandIndex4
- LeftHandMiddle1
- LeftHandMiddle2
- LeftHandMiddle3
- LeftHandMiddle4
- LeftHandRing1
- LeftHandRing2
- LeftHandRing3
- LeftHandRing4
- LeftHandPinky1
- LeftHandPinky2
- LeftHandPinky3
- LeftHandPinky4
- LeftHandExtraFinger1
- LeftHandExtraFinger2
- LeftHandExtraFinger3
- LeftHandExtraFinger4
- Right Fingers
- RightHandThumb1
- RightHandThumb2
- RightHandThumb3
- RightHandThumb4
- RightHandIndex1
- RightHandIndex2
- RightHandIndex3
- RightHandIndex4
- RightHandMiddle1
- RightHandMiddle2
- RightHandMiddle3
- RightHandMiddle4
- RightHandRing1
- RightHandRing2
- RightHandRing3
- RightHandRing4
- RightHandPinky1
- RightHandPinky2
- RightHandPinky3
- RightHandPinky4
- RightHandExtraFinger1
- RightHandExtraFinger2
- RightHandExtraFinger3
- RightHandExtraFinger4
- Left Toes
- LeftFootThumb1
- LeftFootThumb2
- LeftFootThumb3
- LeftFootThumb4
- LeftFootIndex1
- LeftFootIndex2
- LeftFootIndex3
- LeftFootIndex4
- LeftFootMiddle1
- LeftFootMiddle2
- LeftFootMiddle3
- LeftFootMiddle4
- LeftFootRing1
- LeftFootRing2
- LeftFootRing3
- LeftFootRing4
- LeftFootPinky1
- LeftFootPinky2
- LeftFootPinky3
- LeftFootPinky4
- LeftFootExtraFinger1
- LeftFootExtraFinger2
- LeftFootExtraFinger3
- LeftFootExtraFinger4
- Right Toes
- RightFootThumb1
- RightFootThumb2
- RightFootThumb3
- RightFootThumb4
- RightFootIndex1
- RightFootIndex2
- RightFootIndex3
- RightFootIndex4
- RightFootMiddle1
- RightFootMiddle2
- RightFootMiddle3
- RightFootMiddle4
- RightFootRing1
- RightFootRing2
- RightFootRing3
- RightFootRing4
- RightFootPinky1
- RightFootPinky2
- RightFootPinky3
- RightFootPinky4
- RightFootExtraFinger1
- RightFootExtraFinger2
- RightFootExtraFinger3
- RightFootExtraFinger4
- Roll
- LeftUpLegRoll
- LeftLegRoll
- RightUpLegRoll
- RightLegRoll
- LeftArmRoll
- LeftForeArmRoll
- RightArmRoll
- RightForeArmRoll
Once again youve posted something directly involved with what im currently trying to learn! This was a great help to a few people i know working on motionbuilder rigs
Hey… how about a little toot on motion editing, specifically characters using props (the prop half)
Its really great to see you posting on here again!!
All the best
Aaron
The spycam is really paying off!:)
All in good time, I’m just about to update “How to Characterize a Character” tutorial to 2014 and then I plan to move on to editing tutorials – and you’re request will go straight to the top of the pile!
Big thanks for the continued support!
Mo…
Awesome tutorial! What if I have 2 hip bones? RightHip and LeftHip that connect the Upper leg with Hip ?
How can I characterize them?
Thanks…
What are the Right/LeftHip bones doing? Are they just for skinning or do they move something?
If they don’t need to do anything you should be able to leave them out of the Characterization and just use the “Hips’ and “UpperLeft/Right Legs” as normal.
I’m confused what exactly are you calling hips in the naming conventions? I have looked at at least 2 different pictures for the naming convention and I’m still not sure what you are naming as the hips. Can anyone explain this to me?
Usually the “Hips” is the top joint in the character skeleton hierarchy, the joint the legs and spine are attached to. Hopefully you can just see it in the top picture, near the centre.
I’m not sure what exactly what you are naming as hips in the naming convention picture.