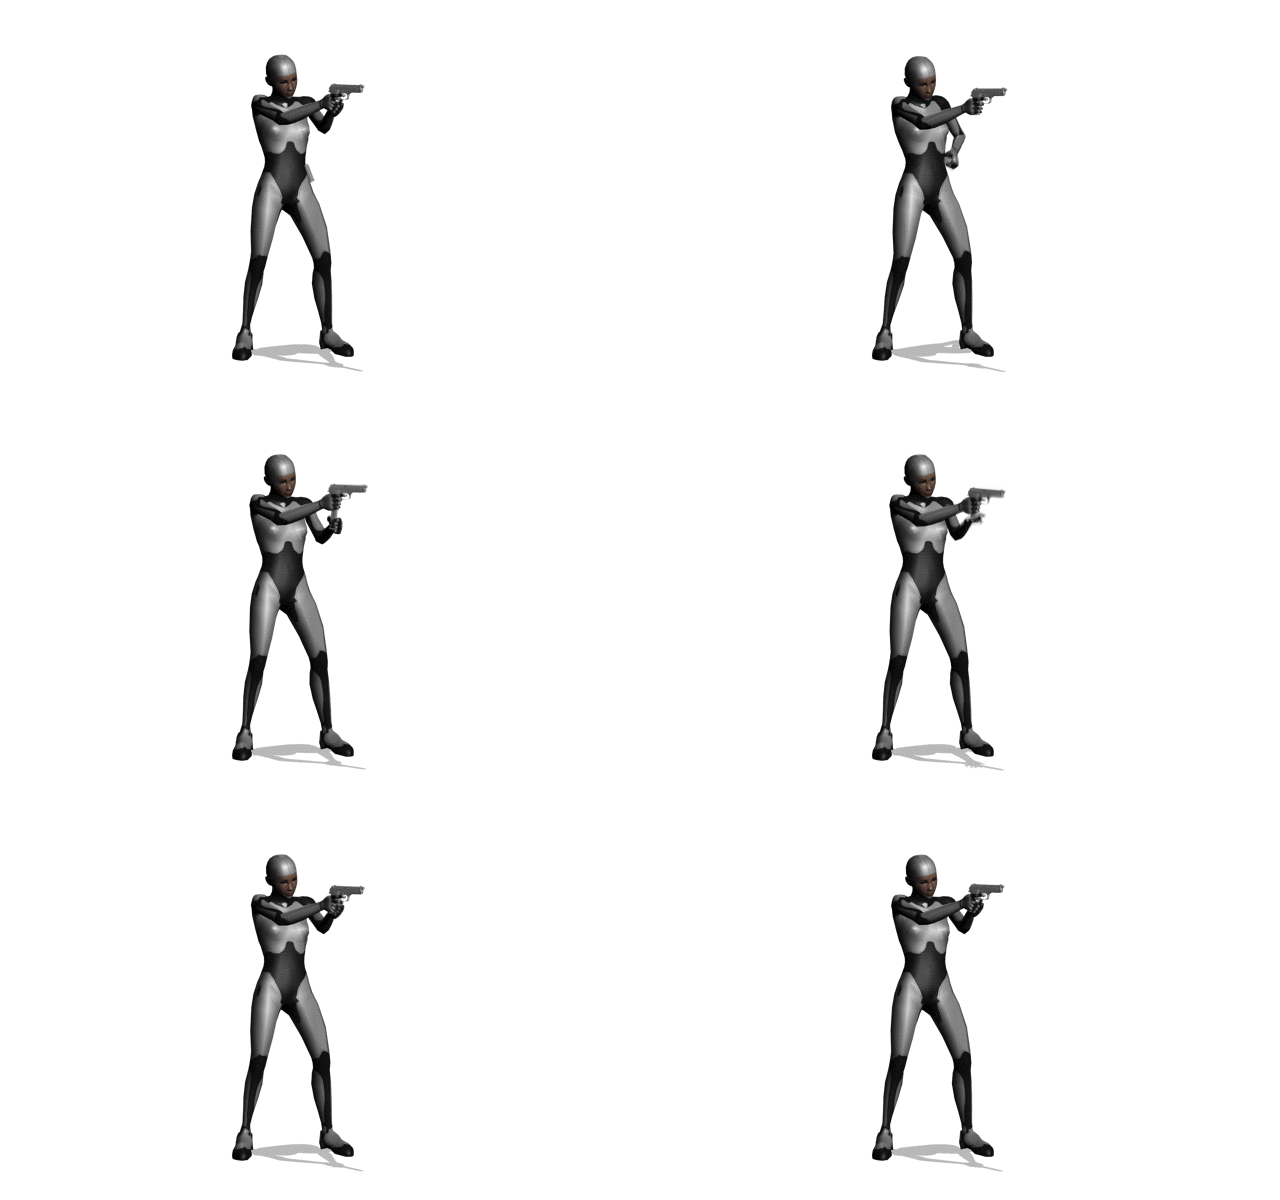
Whether you’re mirroring a hand pose, looping an animation or adding pre-built poses to actions, applying a pose to a character is something you’ll do almost every time you edit a file in MotionBuilder.
In this tutorial you’ll learn how to use the Pose Controls to create a library of poses you can save, merge and paste onto any character with a Control Rig.
I’ll show you how to:
- Add a prop to a character extension
- Edit an action to make it feel more responsive
- Create strong, dynamic character poses
- Match, paste, mirror, save and load poses
- Animate props using Multi-Referential Constraints and Aux Effectors
“Build a figure in such a way that its pose tells what is in the soul of it. A gesture is a movement not of a body but of a soul.”
Leonardo da Vinci
01 Merge Character and Prop
The character and prop are usually created in separate files so the first thing to do is merge them into the same scene.
Open Character
Rather than working on the file used to create the mocap data, open a “clean” version of the characterized character to work on. This helps avoid errors and unwanted items in the scene.
IMPORTANT: THE CHARACTER MUST BE CHARACTERIZED
- File > Open… a character: From the File menu select Open… and use the Open File browser to select the file containing a “clean” characterized character.
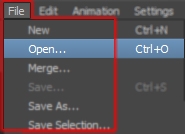
- Set Open Options: In the Open Option window set the following options:
- Load All Elements: In the Scene section, Right-Click in the Elements column and select Load All Elements from the pop-up window. This will load all the elements in the scene file.
- Discard All Animation: In the Scene section, Right-Click in the Animation column and select Discard All Animation from the menu. This makes sure the objects in the scene you are about to load DO NOT contain any animation.
- Discard All Takes: In the Takes section, Left-Click the word Import at the top of the Import column. This will deselect all the Takes in the file so when it opens, there will only be one empty take named “Take 001”.
- Open: Finally, click Open.
Merge Prop
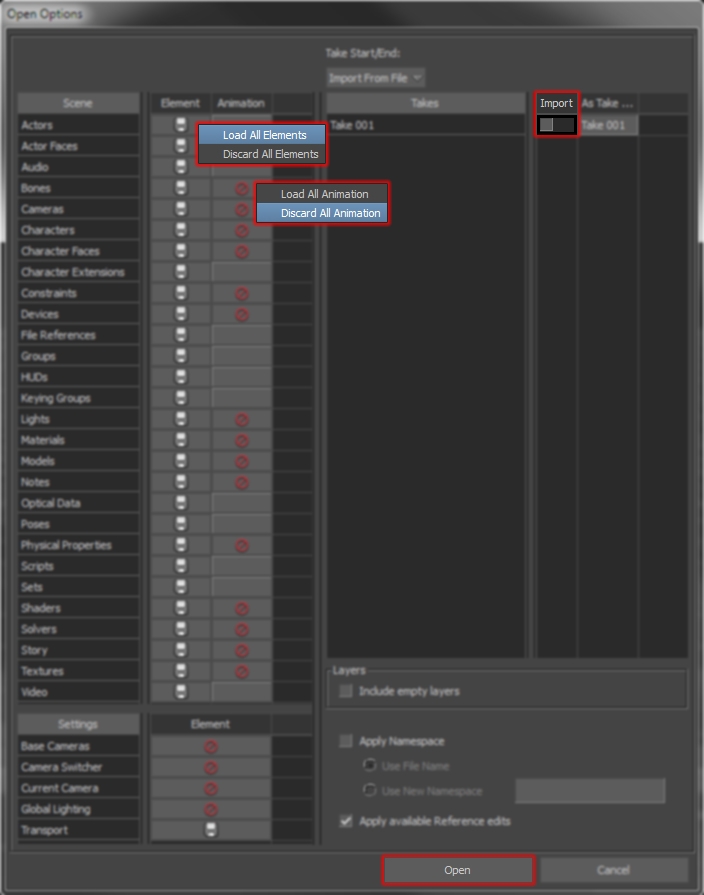
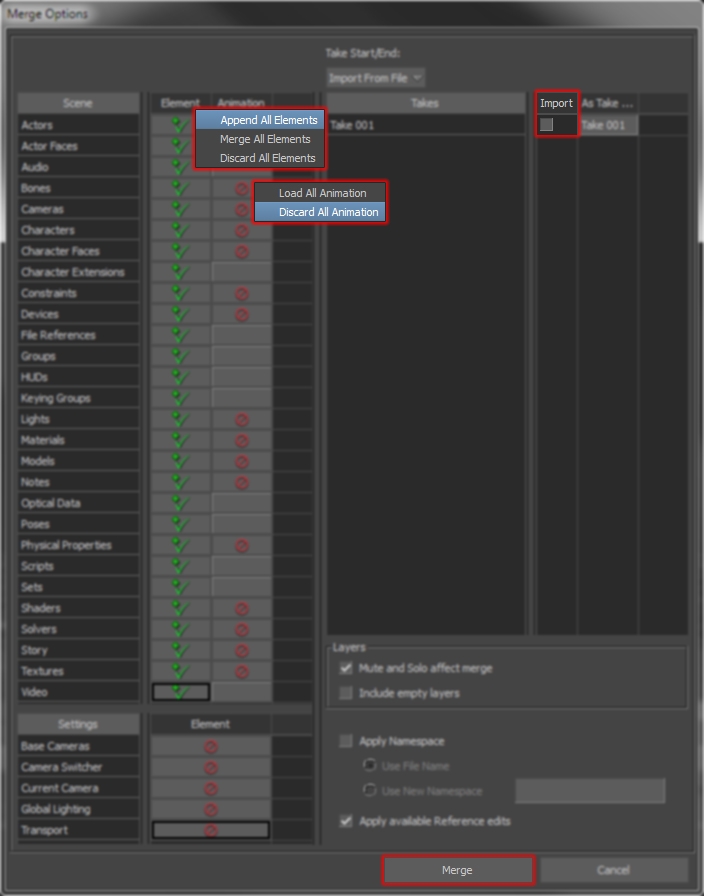
File > Merge… lets you merge or append assets from another file into your scene. The Merge Options window lets you specify which Scene Elements, Animation, Settings, and Takes are merged or appended to the current scene.
- Append – Assets with the same name are NOT replaced.
- Merge – Replaces any assets with the same name.
- File > Merge… the Prop: From the File menu select Merge… and use the Open File browser to select the file containing the prop.
- Set Merge Options: In the Merge Option window set the following options:
- Append All Elements: In the Scene section, Right-Click in the Elements column and select Append All Elements from the pop-up window.
- Discard All Animation: In the Scene section, Right-Click in the Animation column and select Discard All Animation from the menu. This makes sure the objects in the scene you are about to load DO NOT contain any animation.
- Discard All Takes: In the Takes section, Left-Click-the word Import at the top of the Import column. This will deselect all the Takes in the file so no animation is merged.
- Merge: Finally, click Merge.
Parent Prop to Null
Parenting the prop rig to a null keeps the animation separate from the object. This means you can change the prop, without loosing the animation.
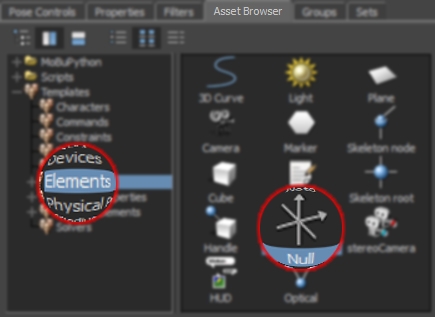
- Add a Null Object: Left-Click-Drag a Null object from Asset Browser>Elements folder onto the root of the prop rig in the Viewer window – you should see the object turn green. This adds a null to the scene and aligns its global translation to the prop.
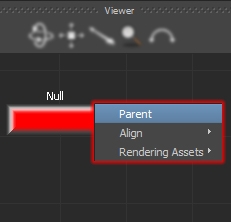
- Parent Prop To Null: Switch to Schematic View (Ctrl+e) and Alt+Left-Click-Drag from the prop object to the Null. Select Parent from the pop up menu.
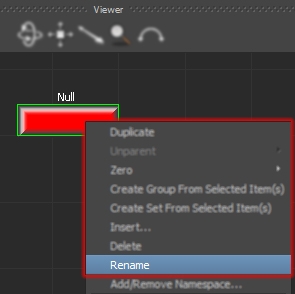
- Rename Null: Right-Click the Null in the Schematic View and select Rename from the pop-up menu. Type a new name in the box provided – for instance “propRoot”.
02 Constrain Prop
A Parent/Child constraint creates a parent>child relationship between any two objects without changing their hierarchies. Once the constraint is activated, the “child” object will follow any movement made by the “parent” object.
Align Prop
- Select Prop Root: Switch to the Schematic view and find the root of the Prop hierarchy. If you created a “propRoot” in the previous step, use this. It is much easier to identify the root of a hierarchy using the Schematic view, especially in complex rigs or where joints can have the same world space position.
- Align Prop: Alt-Left-Click-Drag the “propRoot” onto the joint closest to where the prop will be held. For example, the character’s wrist or “prop joint”. The joint will turn green to show it is selected. From the Pop-up Menu that appears when you release the mouse button, select Align>Translation/Rotation to align the prop with the joint.
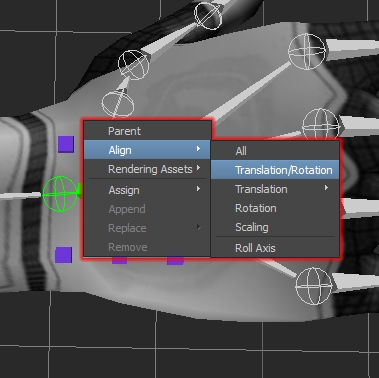
- Refine Prop Alignment: If your rig contains a “Prop Joint”, you may need to skip to the next step and parent the prop to the joint BEFORE you position it. Refine the alignment of the prop with the hand using the Translation (t) and Rotation (r) manipulators. Switch to between Global (F6) and Local (F5) transformations and use (f) to refocus camera when necessary.
Create Parent/Child Constraint
- Add a Parent/Child Constraint: From Asset Browser > Templates > Constraints drag a Parent/Child Constraint directly onto the “propRoot” (Child) object. From the pop-up menu select Constrain Object. If you select the wrong object or setting, you can correct this in the Constraint Setting panel.
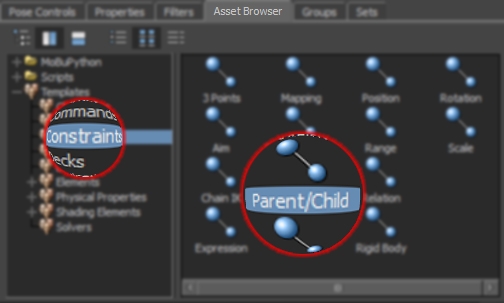
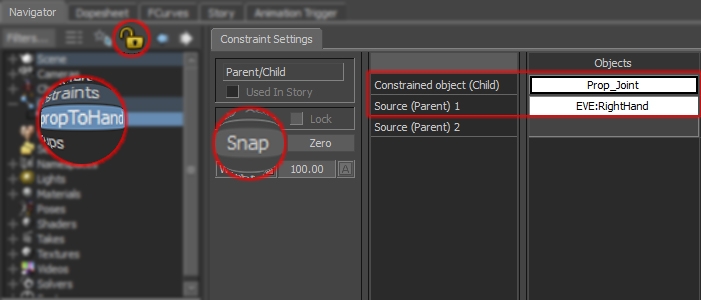
- Lock Constraints Panel: Expand Navigator>Scene Browser>Constraints and Double-Click the Parent/Child Constraint to open the Constraint Settings panel. Click the yellow padlock icon to lock the panel so it does not change when you select the next objects.
- Set Parent Object: Select the Parent object, for instance the Right Wrist/Hand or Prop Joint. Alt+Left-Click-Drag the object from the Viewer window into the Source (Parent) 1 slot. Using a joint in the character rather than one of the Effectors in the Control Rig lets you reactivate the constraint even if the Control rig has been removed.
- Changing Source and Constrained object: In the Constraint Settings panel, Left-Click-Drag an object into the correct slot or Alt+Left-Click-Drag a different object from the Viewer window.
- Activate Constraint: Click Snap to activate the constraint and keep the current offset between the Parent and Child objects. Or click Zero to align the “Child” object with the “Parent” and active the constraint.
- Rename Constraint: In Navigator>Scene Browser>Constraints, Right-Click the constraint and select Rename from the pop-up. Type a new name in the text box, for instance “propToHand”, and hit Enter on the keyboard.
- Test Constraint: Move the character’s arm and hand to test the constraint is working correctly. Click the yellow padlock icon again to “unlock” the Constraint Settings panel.
03 Add Prop to Character Extension
Character Extensions are used to associate props with your character. It adds them to the Poses you create and lets you key frame them using the character’s Full Body Keying Group.
Before you begin using the Character Extension, you need to define a Reference Object. The Reference Object identifies the part of the character the Character Extension is attached to. This object is then used to calculate the position of the prop.
Create Character Extension
- Create Character Extension: Right-Click the Character in Scene Browser>Characters and select Create Character Extension from the pop-up menu.
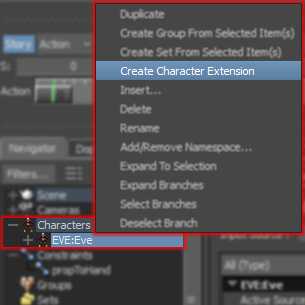
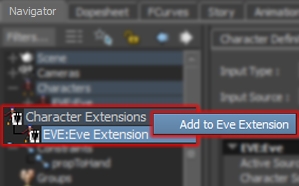
- Add Prop to Character Extension: Expand Character Extensions in the Scene Browser. Alt+Left-Click-Drag the “propRoot” onto <CHARACTER_NAME> Extension and select Add to <CHARACTER_NAME> Extension from the pop up menu.
Add Reference Object
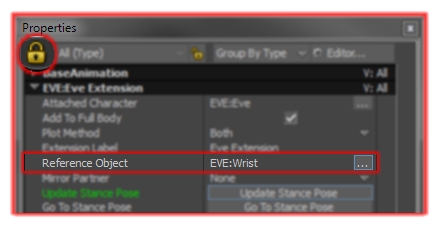
- Lock Character Extensions Properties: In the Scene Browser>Character Extensions Left-Click the Character Extension you just created. Then, open the Properties window and Left-Click the yellow padlock Selection Lock button. This “Locks” the window so it does not change when you select another object.
- Select the Reference Object: Select the object closest to the Character Extension you want to the prop to follow. For example, select the Wrist Joint if you want the prop to follow the motion of the hand.
- Set as Reference Object: Alt+Left-Click-Drag the selected body part into the Reference Object field in the Properties window. The position of the Character Extension will now be calculated using this Reference Object. For example, when a pose is created or pasted.
- Reference Object Change Warning: When you add the Reference Object a dialog box will appear. This warns you that “Changing the Reference Object updates the stance pose for the Character Extension. Any poses created with the previous Reference Object they may be altered.” As we haven’t created any Poses, this isn’t a problem.

Save File
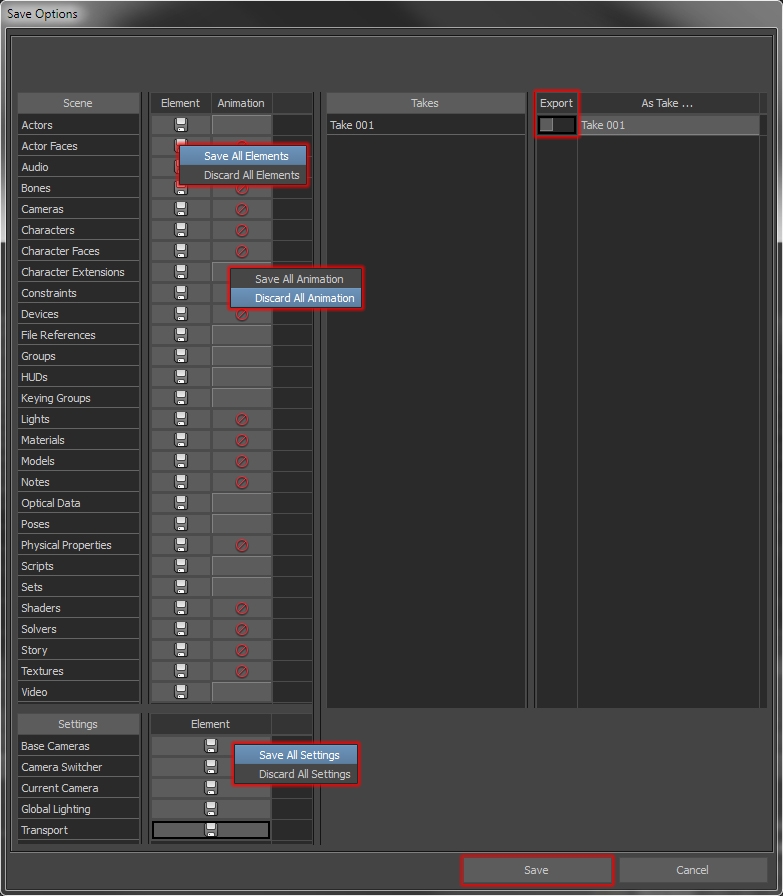
Save a version of this file for editing other actions that use the same character prop set-up. This also gives you a point you can return to if anything goes wrong when you import the mocap in the next step.
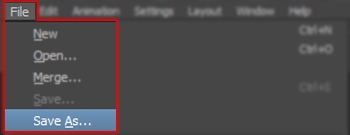
- Save the File: From the File menu select Save As… and use the Save File browser to navigate to a location you want to save the file. For example, a “SETUP” folder that contains characterized rigs.
- Set the File Name: Try to use a file name that describes what the file contains, for example <CHARACTER_NAME>_<PROP_NAME>_SETUP_V001.fbx. The “_V001” will help you track any changes, for instance, if the weapon is updated.
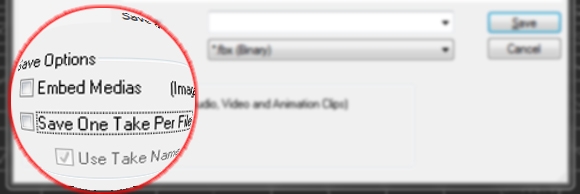
- DO NOT Save One Take Per File: Turn OFF the Save One Take Per File option in the Save File browser.
- Set Save Options: In the Save Option window set the following options:
- Save All Elements: In the Scene section, right-click in the Elements column and select Save All Elements from the pop-up window. This saves all the elements in the scene.
- Discard All Animation: In the Scene section, Right-Click in the Animation column and select Discard All Animation from the menu. This removes any animation from the file.
- Discard All Takes: In the Takes section, Left-Click the word Import at the top of the Import column. This helps makes sure the file does not contain any animation.
- Transport Settings: In the Settings section, right-click in the Element column and select Save All Settings from the pop-up window.
- Save: Finally, click Save.
04 Import Motion Capture
By selecting certain objects and Import Options, you can specify exactly where key frames are applied when importing animation.
Import Options
Before you select the objects to import the animation onto, you need to decide which Import Options you’re going to use:
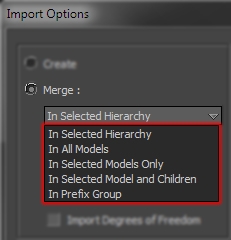 In Selected Hierarchy: Imports the animation onto all the objects in a hierarchy by finding the root node of the selected object. This option may not be suitable for complex rigs where you want to avoid importing animation onto certain objects.
In Selected Models Only: Imports animation onto the selected objects ONLY. This helps avoid importing animation on to objects or constraints that might cause an error.- In Selected Model and Children: Imports the animation in to a continuous hierarchy of objects, using the selected object as the root. This option can be used to import animation onto a section of the body. For example, selecting the Right Shoulder joint will import the animation onto the Right Arm.
Select Import Objects
Once you have decided how you want to import the motion capture, you need select the appropriate objects using one of the following methods:
…manually: To import mocap In Selected Models Only or In Selected Hierarchy.
- Select Single Object: Left-Click
- Add to Selection: Middle-Click / Ctrl+Left-Click / Spacebar+Left-Click
- Remove from Selection: Ctrl+Left-Click / Spacebar+Left-Click-Drag
- Select Object and Children: Spacebar+Right-Click
- Select Object and Parents: Shift+Right-Click
- Select Entire Hierarchy: Ctrl+Shift+Right-Click
- Deselect Everything: Shift+d / Double-Click in empty space
…by Type: To import mocap onto specific types of objects.
- Turn on Selection Mask: Turn on the appropriate selection mask in the Viewer window. For example, turn on the Skeleton Selection mask to select only Skeleton joints.
- Switch to X-Ray or Schematic view: With your pointer over the Viewer window press Ctrl+a to switch to X-Ray mode or press Ctrl+w to switch to Schematic View. Press f to frame everything in the window.
- Drag Select All Objects: Left-Click+Drag over the all the objects in the scene. Only the objects included in the selection mask will be selected.
…by Name or Namespace: To import animation onto objects that have a specific naming convention.
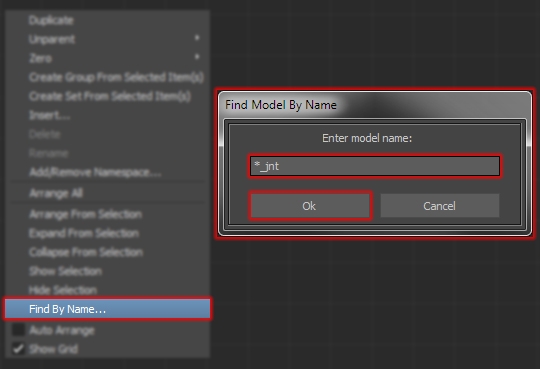
- Switch to Schematic View: With your pointer over the Viewer window press Ctrl+w or use the Viewer>View>Schematic menu option.
- Find By Name: Right-Click in the Viewer window and select Find By Name… from the pop up menu. In the Enter model name: box, type the name of the models you want to select, including the namespace and wildcards (*). For example, “*_jnt” or “<NAME_SPACE>:*_skel”.
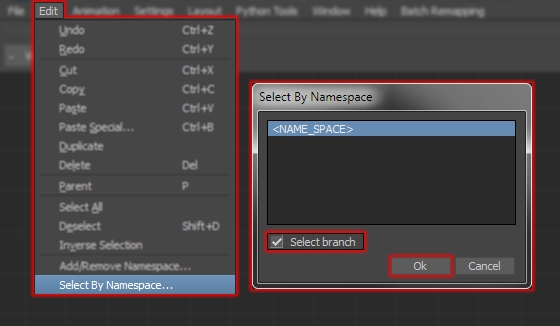
- Select By Namespace: From the Edit menu, choose Select By Namespace… In the Select By Namespace window, click the required namespace, followed by Select branch. Finally click Ok to select all the objects in that namespace.
Import Motion Capture
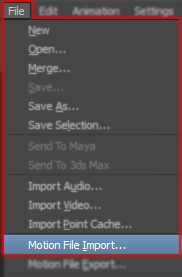
- File > Motion File Import… the mocap: From the File menu select Motion File Import… Use the Import File browser to select the file contacting the motion capture you want to import. Click Open to import the file.
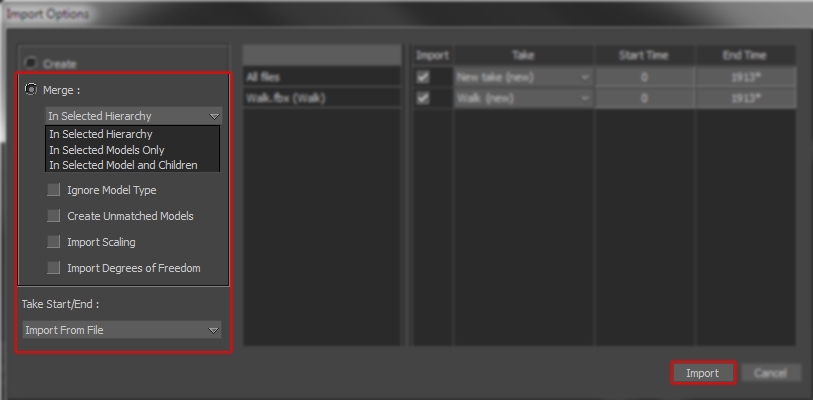
- Set Import Options: In the Import Options window set the following options:
- Set Merge Option: Under the Merge section, select the import option from the drop down menu based on the choices you made in the previous steps.
- Deselect Options: Turn off all the other options in the Merge area.
- Set Take/Start End: From the Take Start/End drop down menu, select Import From File. This sets the start and end frames of the take in your scene to match the file you are importing.
- Import: Finally, click Import.
Import Warning
During the import you may get a warning saying that MotionBuilder couldn’t match all the models in your scene. This is usually due to a mismatch between the number of objects in the scene and the number of objects in the file you are importing.
If the character rig in your scene is the same as the rig in the file you are importing, this shouldn’t be a problem and you can ignore the warning and click Continue.
If the character rig in your scene is NOT the same as the rig in the file you are importing, you will need check both rigs have the same number of joints, the same hierarchy and the same joint names before you continue.
Import Trouble Shooting
Below is a list of the most common problems you’ll have importing animation onto your character in MotionBuilder.
No Animation:
- Check you are using the correct Import Option for the objects you have selected. You’ll be surprised how many times you select the root of the character, and forget to change the import options from In Selected Models Only to In Selected Hierarchy.
- Check the names of the objects in the file you are importing match the names of the objects in your scene. The importer compares the object names in both files. If it cannot find an object by name, it cannot import animation onto it.
- Check the motion capture in the scene you are importing has been plotted/baked to the BaseAnimation layer on the objects you importing. If the animation is on a Control Rig or Constraint, the animation will not import.
- Check the file you are importing contains animation. If the Save Options were set to Discard All Animation when the file was created, the file will have been saved without animation.
Incorrect Animation
- Check the file name is correct. The file may have been named incorrectly or it may contain the wrong take.
- Check the correct performance was processed to the character. Sometimes the wrong take, frame range or actor performance can get process to the wrong character.
Objects Not Animated
- Check the object names in both files are identical. The importer compares the object names in both files. If it cannot find an object by name, it cannot import animation onto it.
- Check both hierarchies are the same. The importer starts at the top of the hierarchy and works its way down to the bottom. If the hierarchies are different, the import will fail at that point and the animation will not be imported onto the remaining objects.
Key Frames are on sub- frames or have a * next to them
- Check you have your scene set to the correct frame rate in the Transport Controls>Time Format Menu.
- Check the file has be processed at the correct frame rate.
Delete Take 001
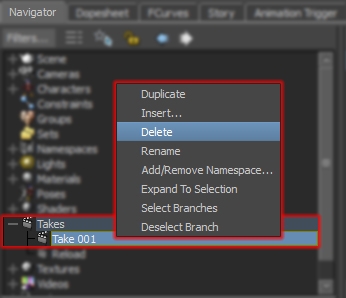
- Expand Takes: In the Scene Browser, Double-Click the Takes branch to expand it.
- Delete Take: If the default empty “Take 001” exists – or any other takes you want to remove – Right-Click it and select Delete from the pop up menu.
Save File
Before you start editing, create a new version of the file. You can come back to this file if you make any mistakes in the next step or if you need to create an alternate version of the action later on.
- Save the File: From the File menu select Save As… and use the Save File browser to navigate to a location you want to save the file. For example, an “EDIT” folder.

- Set the File Name: Use a file name that describes what the character is doing. For example <CHARACTER_NAME>_<ACTION>_<PROP_NAME>_EDIT_V001.fbx. Eve_StandingReload_Pistol_EDIT_V001.fbx

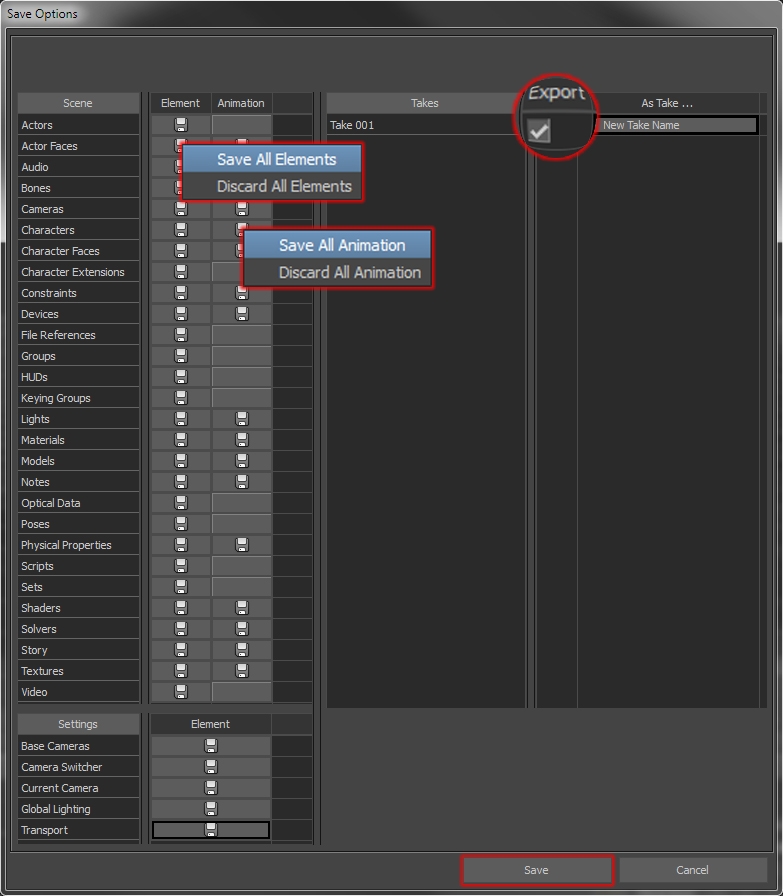
- Set Save Options: In the Save Option window set the following options:
- Save All Elements: In the Scene section, right-click in the Elements column and select Save All Elements from the pop-up window.
- Save All Animation: In the Scene section, right-click in the Animation column and select Save All Animation from the pop-up menu.
- Transport Settings: In the Settings section, right-click in the Element column and select Save All Settings from the pop-up window.
- Save All Takes: In the Takes section, select the individual takes you want to save or left-click the Export column title to select all the takes in the file.
- Save: Finally, click Save.
05 Remove Unwanted Frames
All Motion captured actions contain some unwanted or “dead” frames that need to be removed. One reason for this is the delay between the start of the capture, someone calling “Action” and “Cut”, and the action being performed.
Another reason is the action needs to be responsive. The character needs to move as soon as the animation starts, and the animation needs to end as soon as the character stops moving. Too much “anticipation” or “overlap/settle” will make the character feels unresponsive.
Add Character to Story
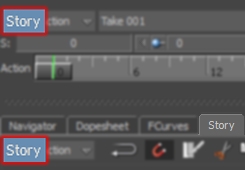
- Turn on Story: Turn on Story mode either in the Transport Controls or the Story Window.
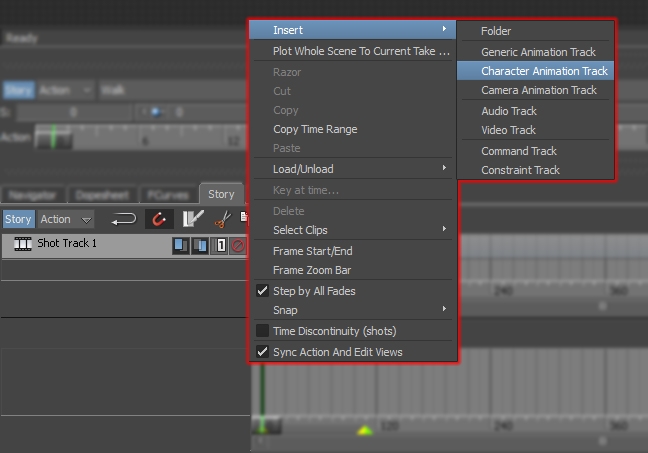
- Insert Character Animation Track: In the Story window Right-Click in the Action Timeline and select Insert>Character Animation Track from the pop-up menu.
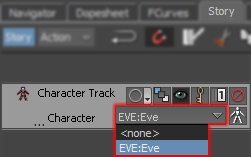
- Assign the Character to the Story track: In the Character Animation Track, select the character’s name from the …Character drop-down menu.
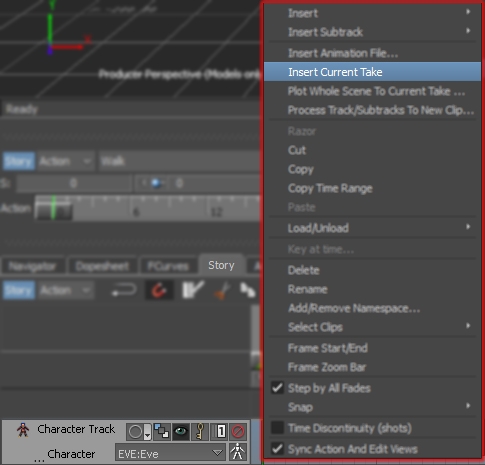
- Insert Current Take: In the Action Timeline of the Character Track, Right-Click and select Insert Current Take from the pop-up menu. This adds the animation from the current take into the Story track.
- Frame Clip: Select the clip and press “f” to frame it in the Action Timeline.
Trim Character Clip
- Find Start Frame: Find the frame where the character begins to move. Try to remove all the “delay” from the action so the character starts moving as soon as the animation plays. You may also need to remove a few frames of anticipation to reduce the time it takes the action to happen. For instance, a punch in a game animation needs to feel like it happens as soon as the button is pressed. If there is too much anticipation or “wind-up”, the action will feel slow and unresponsive.
- Trim Clip: Positions the Time Slider on the first frame of the action from the previous step. In the Story tool set Loop/Scale Clip to Loop. Position your cursor over the beginning of the Character Clip so it changes to a double-ended arrow. Then Left-Click-Drag the edge of the clip to the Time Slider – the Trim Tool should snap to Time Slider. Alternatively, Double-Click the number in the bottom left corner of the Character Clip and enter the start frame number.
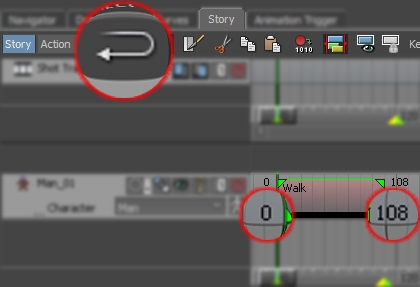
- Find End Frame: Find the frame where the character stops moving. Try to include as much of the natural “settle/overlap” in the action as possible. As with anticipation, the amount of settle you can include may depend on how the final animation will be used. For example, in some animation engines a new animation cannot be played until the previous one has finished. Too much overlap can cause the character to become unresponsive and miss important trigger events.
- Trim Clip: As before, positions the Time Slider at the end of the action from the previous step. Hover your cursor over the end of the Character Clip until it changes to a double-ended arrow. Then, Left-Click-Drag the edge of the clip to the Time Slider – the Trim Tool should snap to Time Slider. Alternatively, double-click the number in the bottom right corner of the Character Clip and enter the end frame number.
- Set Start Frame to 1: Double-Click the number in the top left corner of the Character Clip, type in “1” and hit Enter. Alternatively, move the Time Slider to frame 1 and Left-Click-Drag the Character Clip to the Time-Slider. The clip will snap to the time-slider making it easier to position, especially if the clip is very long.
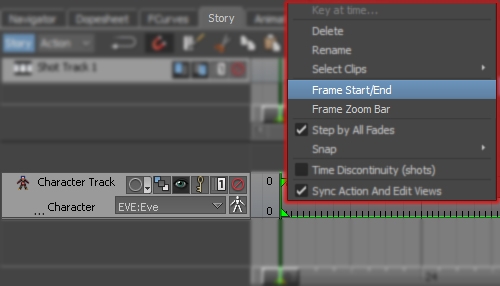
- Frame Start/End: Right-Click in the Story track and select Frame Start/End from the pop-up menu. This will reset the start and end values of the Take to match the clip.
- Check Clip: Turn off Continuous Playback in the Transport Controls. Check the action feels responsive by pressing the Play button in the Transport Controls. The action should start as soon as the Play button is pressed. Also, check the settle at the end of the animation looks natural but doesn’t take too long to complete before you can press Play again.
Centre Mocap
PLEASE NOTE: THE ALIGNMENT OF THE CHARACTER MAY VARY FROM THE STEPS BELOW DEPENDING ON THE PROJECT YOU ARE WORKING ON.
- Switch to Normal or X-Ray Mode: Press Ctrl+a in the Viewer window or use the Viewer>Display menu to switch to Normal or X-Ray mode. If you are in Model Only mode the Ghost created in the next step, will not be visible.
- Show Ghost: In the Character Track turn on Show/Hide Ghosts. The “Ghost” represents the start and end position of the character, joined by a straight line. A “Ghost” of the character’s skeleton is also displayed but it is usually hidden behind the character.
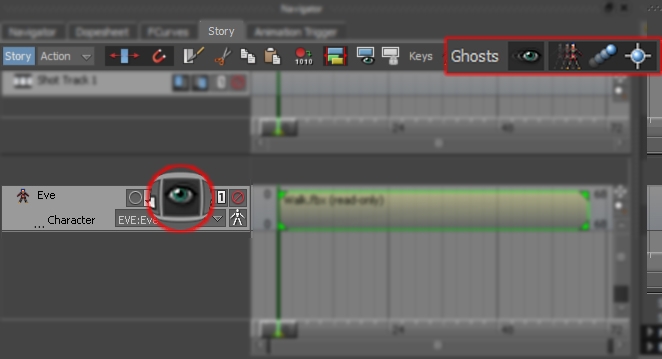
- Deselect everything: Before you align the clip in the next step, you need to make sure you have nothing else selected. To do this, Double-Click in an empty area of the Viewer window or press Shift+d. If another object is selected, the transforamtion values of the clip will be displayed relative to that object, making the next steps less accurate.
- Centre the Action: Switch to Translation mode (t). Left-Click the clip in the Story tool (the border should change to green) and type “0” (zero) in the X, Y and Z Global/Local fields in the bottom right corner of the Viewer window. This will align the characters root with the centre of the scene.
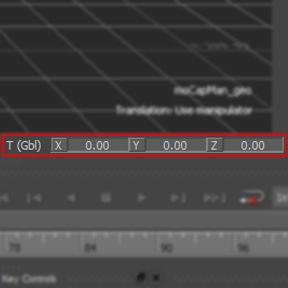
- Align to Floor: Still in Translation mode with the clip selected, adjust the Y value to align the character’s feet with the floor.
- Align Rotation: If the character is not facing along the correct axis, use the Rotate Manipulator (r) to realign it. The Orthographic Camera views (Ctrl+f, Ctrl+t, Ctrl+r) can be used to check the alignment of the character.
Plot to Control Rig
- Plot Character… to Control Rig: In the Scene Browser>Characters>”CHARACTER_NAME”>Character Settings tab click Plot Character…. In the Character pop-up window click Control Rig. Alternatively, in the Character Controls window select Bake (Plot) > Bake (plot) To Control Rig…

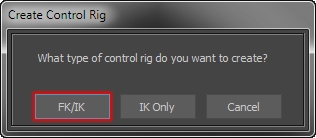
- Create FK/IK Rig: If your character doesn’t already have a Control Rig attached to it, the Create Control Rig window will be displayed. Simply click FK/IK to create and FK/IK control rig for your character.
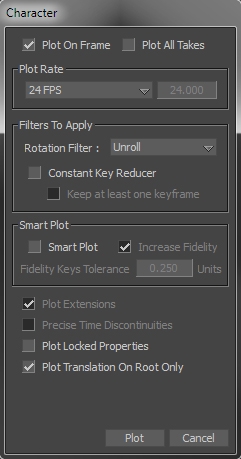
- Set Plot Options: Set the following Plot Options in the Character pop-up window and click Plot:
- Plot On Frame = ON
- Plot All Takes = OFF
- Plot Rate = Match the frame rate in the Transport Controls>Time Format Menu
- Rotation Filter = Unroll
- Constant Key Reducer = OFF
- Smart Plot = OFF
- Plot Locked Properties = OFF
- Plot Translation On Root Only = ON
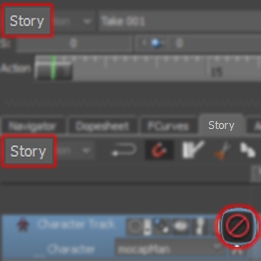
- Turn Story Off: When the plotting is complete, turn off Story mode in the Transport Controls or Mute the Story Track and turn off Story in the Story window. DO NOT delete the track just yet in case the action doesn’t work as well as you’d hoped.
- Check Playback: Play the animation to check the character still moves in the same way as it did before Story was turned off. If it doesn’t, try turning Story back on and repeat steps 1-4.
Save File
Once you have the mocap trimmed to the correct length, save a version before you start working on the pose – V002 if you’re playing along at home.
06 Pose the Character
A good Pose should tell a story. It should express what the character is thinking and feeling as well as their personality and physicality.
Remember, the Pose is part of a series of actions. The character has either just finished doing something or is about to do something new. They should never be doing “nothing”.
Find the Most Dynamic Pose
Depending on how the action was performed, the pose at the end of the action often looks more dynamic than the pose at the start.
The performer has to complete an action before getting into the base pose. Because of this, the end pose will have the same energy as the action, making it more dynamic. The pose at the start doesn’t always have this energy, especially if the performer casually moves in to position before you start capturing.
Enhance the Pose
A good performer will provide the intent and motivation for the pose in their performance. Your goal is to take that pose and adapt for the character it has been mapped to.
- Describe the Pose: Before you start editing, describe in one sentence what is happening in the Pose. Avoid simple phrases like “standing” or “pointing a gun” and think about the how, where, when and why. For example, “crashing into cover behind a post, he stands focused, ready to return fire”. This will help you think about what is happening in the pose before you start making adjustments.
- Make it Clear: The pose must clearly show what a character is doing, even if the character is in silhouette. There should be a clear line of action that describes the direction of the force through the body. The stronger and more connected this line is, the more dynamic the pose will feel.
- Edit the Whole Pose: Try to keep the whole pose in mind as you adjust the individual parts of the character. Think about how the position and angle of each joint can help tell the story of the pose.
- Keep Changes Small: As you adjust the pose, try to keep the changes to a minimum. Remember, this pose could be the start and end position of a lot of different actions. The more you change it, the more difficult it will be to apply it to other actions.
- Include the Prop: As you position the prop, don’t forget it also forms part of the overall pose. It should follow the same line of action, shape and overall silhouette as the rest of the character.
- Check from Every Angle: View the pose through the shot camera if you are using one. Or use the Perspective camera (Ctrl+E) and the different orthographic cameras (Ctrl+R, Ctrl+F, Ctrl+T) to make sure it looks good from every angle it will be seen.
Set Flat Key
Once you are happy with the pose, set a key frame before creating a Pose.
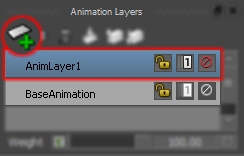
- Create Animation Layer: In the Animation Layers window, switch to AnimLayer1 or add a New Layer if it doesn’t exists.
- Turn On Full Body Keying Mode: In the Character Controls window, turn on Full Body keying mode. As you’re going to be working on the entire character, it’s easier to use Fully Body key mode so you don’t forget to key anything.
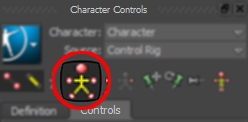
Full Body Keying Mode
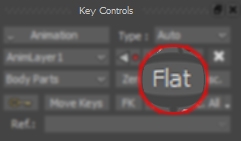
- Set a Flat Key: In the Key Controls window set a Flat key. This will set the tangents to Flat and help stop any unwanted “drifting” between the key frames later.
07 Using the Pose Controls
The Pose Controls let you to create a library of poses you can use to edit your animation.
Each Pose creates a snapshot of the selected character’s position using the Control Rig. This mean these libraries can be saved and merged into any file containing a character that has a Control Rig.
Create Pose
- Frame Character: Frame the character in the Viewer window. This isn’t a crucial step, but as the Pose Controls generates a thumbnail when you create the pose, you might as well make the most of it.
- Create Pose: In the Pose Controls window click Create. The character’s current Pose is added to the Pose Controls browser at the end of the list – you may need to expand the Poses branch to see it. Also, because the prop was added as a Character Extension, its position will also be stored in the Pose.
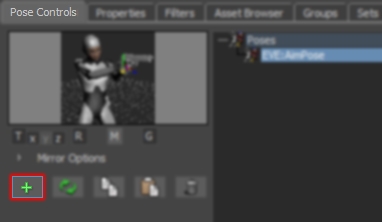
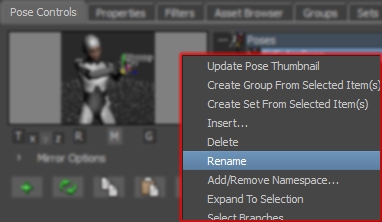
- Rename Pose: In the Pose Controls window, Right-Click the pose you’ve just created and select Rename from the pop-up menu. Rename the pose to something more descriptive like “<TYPE_OF_ACTION>_BasePose”.
Match Options
Before pasting a Pose on to your character, you need to decide how you’re going to align it.
Poses can be pasted in the position they were originally created or aligned to match the position and rotation of any Effector, Auxiliary Effector, or object included in a Character Extension.
PLEASE NOTE: The Match Options are only available in Full Body Keying mode.
- Select Object to Match: Select an Effector, Auxiliary Effector, or the object used in the Character Extension to align the pose with – the Character Extenstion object can be selected in the Scene Browser>Character Extension window. Even if you’re not planning to align the pose to an object, as in this tutorial, it will help make sure you have the correct character selected.
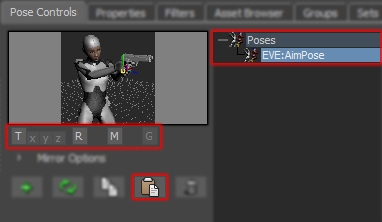
- Set Match Translation (T) OFF: The Match Translation options control where the pose will be pasted. Left-Click the Match Translation option to turn it OFF (light-grey background).
- Match Original Translation: With Match Translation turned OFF the Pose will be pasted in the position it was originally created.
- Match Current Translation: If Match Translation is ON, the pose will be pasted to match the current global translation of the selected object.
- Match Single Translation Axis: If Match Translation is ON, the pose can be pasted to match a single axis by selecting the x, y, or z axes – to access the match y option, you need to turn match Gravity (G) OFF.
- Set Match Rotation (R) OFF: The Match Rotation option controls how the pose will be aligned when you paste it. Left-Click the Match Rotation (R) option to turn it OFF (light-grey background).
- Match Original Rotation: If Match Rotation is turned OFF, the Pose will be pasted using the original rotation values.
- Match Current Rotation: With Match Rotation ON, the pose will be pasted to match the current global rotation of the selected object. PLEASE NOTE: if Match Gravity is ON, Match Rotation will only match the global Y rotation value of the selected object (see below).
- Set Match Gravity (G) OFF: Match Gravity is used to keep the character’s feet aligned with the floor when pasting a pose. This means some of the translation and rotation values are ignored when pasting the pose. Left-Click the Match Rotation (R) option to turn it OFF (light-grey background). PLEASE NOTE: The Match Gravity option is only available when match the Translation (T) or match Rotation (R) options are turned ON.
- Match Gravity ON: Only the global X and Z translations and Y rotation of the selected object are used to align the pose. The Y translation (hip height) and X and Z rotation (hip level) are taken from the original pose (if you are pasting a Pose that was created on a different character, this can cause the character’s feet to move above or below the floor.
- Match Gravity OFF: If the character’s feet do not need to be aligned with the floor, for example, if the character is climbing on an object, turn match Gravity OFF.
Paste a Pose
The translation and rotation values of all the Effectors, Auxiliary Effectors, and Character Extension objects are stored in the pose. This means a pose can be applied to the entire character or individual sections.
- Select Keying Mode: The Keying Mode controls where the pose is applied. In the Character Controls window, select Full Body Keying Mode.
- Full Body Keying Mode: Applies the pose to the entire character.
- Body Part Keying Mode: Applies the pose to the selected body part. For example, selecting a wrist effector will paste the pose onto the entire arm. Poses cannot be applied to individual objects.

Full Body Keying Mode
- Jump to Opposite End: Press Ctrl+Home or Ctrl+End to jump to the opposite end of the animation.
- Paste Pose: Double-Click the name of the pose in the Poses Controls window to paste it. Or Left-Click select it and then press the Paste button.

- Set Flat Key: In the Key Controls window set a Flat key. This will set the tangents between the two key frames to flat and help stop any unwanted “drifting” between the key frames.
- Check Poses Match: Flip between the first and last frames (Ctrl+Home / Ctrl+End) to check the 2 poses are identical and that the character doesn’t move.
Mirroring a Pose
The Mirror option pastes a mirrored version of the pose onto the character. Just like pasting a normal pose, how it’s applied and where it’s aligned are controlled by the Keying Mode and Match settings.
- Activate Mirror: In the Pose Controls turn, click M to turn the Mirror option ON and expand the Mirror Options.
- Select Keying Mode: The Character Controls>Keying Mode determines how the mirrored pose is applied.
- Full Body Keying Mode: Applies a mirrored version of the pose to the entire character. For example, pasting a mirrored version of a “left-leg-planted-right-leg-passing” pose will create the mirrored “right-leg-planted left-leg-passing” pose.
- Body Part Keying Mode: Applies a mirrored version of the pose to the selected body part. For example, applying a mirrored pose to the Right Fingers will paste the pose from the Left Fingers – useful when a prop changes hands and you need to swap the “Holding” and “Relaxed” poses from one set of fingers to the other.
- Set Match Translation (T): The Match Translation options control where the mirrored pose will be pasted.
- Match Original Translation: With Match Translation turned OFF the Pose will be pasted in the position it was originally created.
- Match Current Translation: If Match Translation is ON, the pose will be pasted to match the current global translation of the selected object.
- Match Single Translation Axis: If Match Translation is ON, the pose can be pasted to match a single axis by selecting the x, y, or z axes – to access the match y option, you need to turn match Gravity (G) OFF.
- Set Match Rotation (R): The Match Rotation option controls how the mirrored pose will be aligned when you paste it. Match Rotation behaves slightly differently when the Mirror option is turned ON.
- Match Current Rotation: With Match Rotation ON, the mirrored pose will be pasted to match the current global rotation of the selected object. PLEASE NOTE: if Match Gravity is ON, Match Rotation will only match the global Y rotation value of the selected object (see below).
- Match Rotation OFF: With Match Rotation turned OFF, the pose will be aligned based on the following Mirror Options…
- Mirror Options: The Mirror Options let you choose which plane you want the Pose to be mirrored along when you paste it. To make it easier to understand what the different settings are doing, turn ON Show Mirror Plane.
- Auto: Uses the selected object and the Match Options to calculate the mirror plane.
- Z-Y: The pose is mirrored along the global Z-Y plane.
- X-Y: The pose is mirrored along the global X-Y plane.
- X-Z: The pose is mirrored along the global X-Z plane.
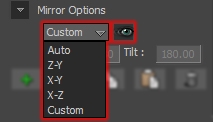
- Custom: Lets you set a custom mirror plane using the Pan (global Y-axis) and Tilt (global X-axis) values.

- Paste Mirror Pose: To Paste the pose, Double-Click the Pose in the Poses Controls browser window or Left-Click select it and press the Paste button.
Update a Pose
Once a pose has been created, it can be updated at any time. For example if you need to make adjustments after feedback.
- Adjust Pose: Make the adjustments to the pose and set a key frame.
- Select Pose: In the Pose Controls browser window, Left-Click select the Pose you want to update.
- Update: Left-Click the Update button – this will also update the thumbnail image.

Pose Thumbnails
The Pose Thumbnail can be updated at any time without updating the actual Pose. The thumbnail can also be used to see how well the pose looks or “reads” in silhouette.
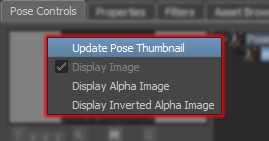
- Update Thumbnail: Reframe the character in the Viewer window. Then, in the Pose Controls window, Right-Click the Pose Thumbnail and select Update Pose Thumbnail from the pop up menu.
- Check Silhouette: In the Pose Controls window, Right-Click the Pose Thumbnail and select Display Alpha Image (white character, black background) or Display Inverted Alpha Image (black character, white background) to view an image of the pose in silhouette.
Delete Pose
A pose can be deleted from the Pose Controls browser if it is no longer needed.
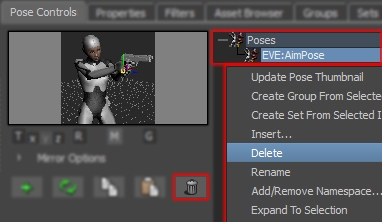
- Select Pose: In the Pose Controls browser window, Left-Click select the Pose you want to delete. To select multiple poses use Ctrl+Left-Click or Shift+Left-Click.
- Delete: Left-Click the Delete icon in the Pose Controls window. If you Right-Click a selected Pose and select Delete from the pop-up menu, you will not be asked to confirm the deletion – but you can still undo the operation…
- Confirm: If you used the Delete icon in the Pose Controls window, you must Ok the request in the Pose Editor window.
Save Poses
When you are happy with your poses, they can be saved into a separate file, merged into another scene, and used to edit a different action.
PLEASE NOTE: THE POSES MUST BE SELECTED IN THE SCENE BROWSER WINDOW. SELECTING THEM IN THE POSE CONTROLS WINDOW WILL NOT WORK.
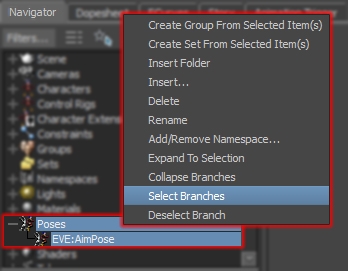
- Select Poses: In the Scene Browser>Poses window, select the poses you want to save. To select all the Poses, Right-Click Poses and choose Select Branches from the pop-up menu.
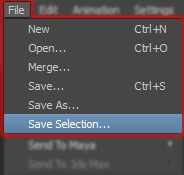
- Save Selection: From the File menu select Save Selection… As the name suggests this will save ONLY the selected objects.
- Name the File: In the Save File browser, choose where to save the Poses and name the file something descriptive. For Example <CHARACTER_NAME>_<TYPE_OF_ACTION>_Poses. Make sure Save One Take Per File is turned OFF.
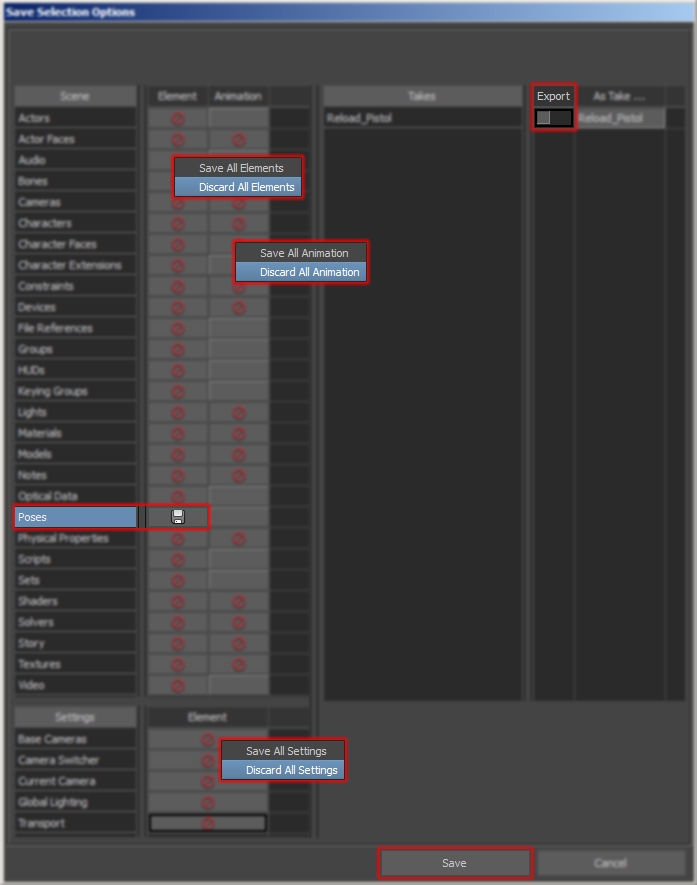
- Set Save Options: To make sure only the Poses are saved in the file, set the following options in the Save Selection Options window:
- Save ONLY Pose Elements: Right-Click in the Elements column and select Discard All Elements from the pop-up window. Then Left-Click in the Elements column next to Poses – a disk icon should appear.
- Discard All Animation: Right-Click in the Animation column and select Discard All Animation from the pop-up menu.
- Discard All Settings: Right-Click in the Settings Elements column and select Discard All Settings from the pop-up menu.
- Discard Takes: Left-Click the Export column name in the Takes section to deselect all the Takes in the scene.
- Save: Finally, click Save.
Load Poses
- Merge Poses: From the File menu select Merge… In the Open File browser, select the FBX file containing the Poses you want to merge.
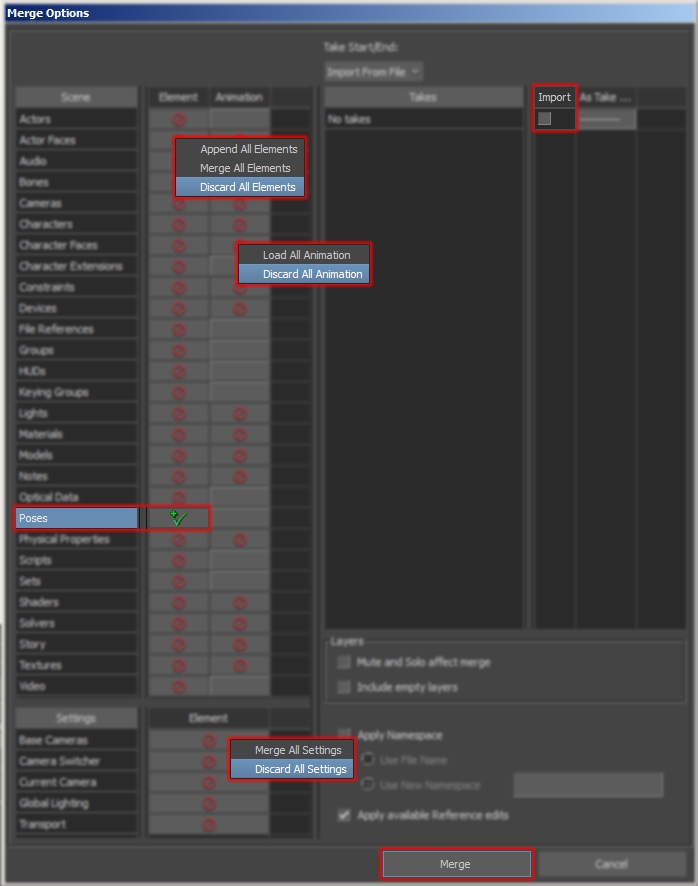
- Set Merge Options: To make sure only the Poses are merged, set the following options in the Merge Options window:
- Append ONLY Pose Elements: Right-Click in the Elements column and select Discard All Elements from the pop-up window. Then Left-Click in the Elements column next to Poses – a green tick (+ü) should appear.
- Discard All Animation: Right-Click in the Animation column and select Discard All Animation from the pop-up menu.
- Discard All Settings: Right-Click in the Settings Elements column and select Discard All Settings from the pop-up menu.
- Discard Takes: Left-Click the Import column name in the Takes section to deselect all the Takes in the scene.
- Merge: Finally, click Merge.
Save File
Now the action starts and ends in a good strong Base Pose, save a version before you begin editing the file – V003 if you’re still playing along at home.
08 Edit Mocap
The following 4 step editing workflow is designed to show you what you should be doing and when you should be doing it.
This will hopefully help you build your own workflow or give you a few ideas to add to your existing one.
Review
Before you begin editing, you need to understand WHAT the character is doing and WHY are they doing it.
Discuss the action with your animation supervisor, designer, programmer, crowd TD. Review the video reference from the mocap shoot. If you can, try performing the action yourself.
Once you understand WHAT the character is doing, think about the WHY they are doing it. What is the character’s motivation, thought process, or objective? What are the technical requirements from a shot, game-play or simulation point of view?
The action will have been designed with all this in mind. The actor and director will have thought about this during the shoot. So you need to think about it while you’re editing, especially when translating a human performance on to non-human character.
The more you know before you begin editing, the better your edits will be.
Plan
Once you know what should be happening and why, you can start to plan how you’re going to make your edits show this.
Play the mocap back on a loop and view it from different angles and at different speeds. Check the file you are about to edit matches the one in the video. Make sure the characters are using the correct actor performance. Look for errors in the character’s motion by comparing it to the video reference. Test the technical requirements of the action can be met. These kind of issues are best fixed before you begin editing.
Finally, plan your edits in the following order:
- Frames to be removed
- Technical adjustments
- Problems to fix
- Details to add
Edit
The next step is to work through your list of edits in order.
Begin by removing any unnecessary frames from the mocap. You don’t want to spend time editing parts of the animation that are going to be deleted.
Next, make any technical adjustments to the action. Re-speed the animation, align characters, constrain props, apply poses. These usually create their own issues, so it’s worth breaking everything now before you start fixing things in the next step.
Work through each of the issues, one problem at a time. Start with the most severe ones that affect the entire character. Then correct each part of the body, working your way down the joint chain. For example, Hips-> Chest->Spine->Shoulder->Upper Arm->Fore Arm->Wrist->Fingers.
Make your edits on the “Extreme” frame of the action. Find the frame just before or after a limb moves or changes direction, or where the problem is at its most severe. This will help “hide” your edit and keep the number of key frames to a minimum.
If the problem needs a lot of key frames to fix, the change might be too big. In this situation it might be worth thinking about reshooting the action or hand animating it.
Refine
The final step is to refine the existing performance.
At this stage you shouldn’t be trying to change the performance into something different. Instead, look for ways to enhance it so it fits with the style of the project or the type of character. Make poses stronger and actions more dynamic. Add missing detail that was lost or wasn’t captured.
Try to keep as much of the original mocap data as possible. Use Animation Layers or adjust the F-Curves on the BaseAnimation layer. Only delete key frames when absolutely necessary, and then only do it one frame at a time. The more key frames you delete, the more detail you will lose. The more detail you lose, the more editing you will need to do to replace it. The more editing you need to do, the more time and money the mocap will ultimately cost.
Save File
When you’re happy with the character animation, save a new version of the file before you start working on the prop – V004 if you’re playing along at home.
09 Animate the Prop
A Multi-Referential constraint creates a complex Parent/Child constraint, where a “Child” object can have multiple “Parent” objects. For example, when a prop needs to be passed from hand to hand, or removed from a pocket or holster.
Create Multi-Referential Constraint
- Identify Parent Objects: Play the animation and identify all the body parts the prop needs to “follow” or be parented to. Besides the joints holding the prop, don’t forget to include any body parts that need to be used as a holster or pocket.
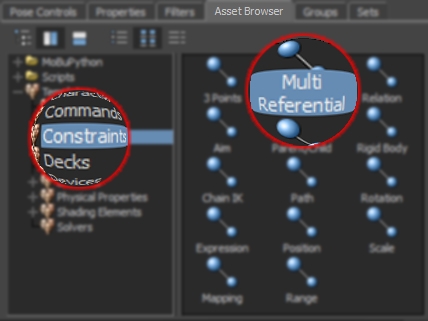
- Add Multi Referential Constraint: Left-Click-Drag a Multi Referential Constraint from the Asset Browser>Templates>Constraints browser into the Viewer window. Or, drag the constraint directly onto the “Prop Joint” – it will turn green to show it is selected – and select Constrain Object from the pop-up menu.
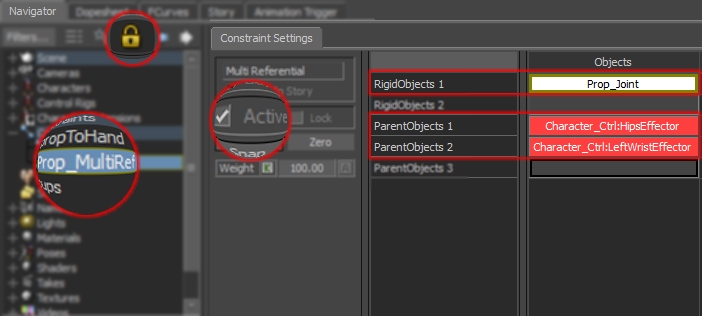
- Lock Constraints Setting Tab: To stop the information in the Constraint Settings Asset window changing when you select another object, click the yellow padlock icon. If the window has already changed, expand the Constraints section in the Scene Browser, and Double-Click the Multi Referential Constraint you just created.
- Constrain Prop: If you didn’t already constrain the “Prop_Joint” in step 2, Alt-Left-Drag the “Prop_Joint” from the viewer window into the “RigidObjects 1” slot.
- Add Parent Objects: Alt-Left-Drag each parent object into the “ParentObjects” slots. A new slot will be created after each addition.
- Activate: Clicking the Active box in the Constraint Settings to activate the constraint.
- Unlock Constraints Setting Tab: Once the constraint is set up, click the yellow padlock icon to unlock the Constraints Setting tab
- Rename: Rename the constraint to something more descriptive, for example “Prop_MultiRef”.
Animate Handovers
- Align Prop: Align the Prop in its first position, for example, in the character’s hand or holster.
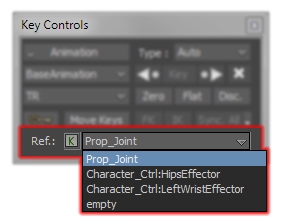
- Set Ref. Object: From the drop-down Key Controls>Ref.: menu, select a “ParentObject”. This will set the first “ParentObject” for the prop to follow, and key the prop’s current position.
- Find Handover Frame: Play through the animation to the frame where the prop needs to follow a different “ParentObject”. For example, as a hand grabs it.
- Align Handover: Refine the position of the prop and hand to create a solid handover pose – don’t forget to key the position of the hands.
- Set Ref. Object: From the drop-down Key Controls>Ref.: menu, select the new “ParentObject”. The position of the prop will be key framed and it will now follow the new “ParentObject”.
- Animate Handovers: Repeat steps 3-5 for each handover action.
- Refine Prop Animation: Although the prop and the hands will be perfectly aligned on the handover frames, the poses in between those frames may need refining. For example, as the character adjusts the prop in its hands to hold it. Go back through the animation and refine these poses, this time setting key frames in the usual way (Key Controls>Key or “k” on the keyboard).
Save File
Once the prop has been animated, save another version before you begin editing the grabs and releases, – V005 if you’re playing along at home.
10 Animate Grabs and Releases
Auxiliary Effectors create additional IK targets for the existing IK Effectors in the Control Rig. These Effectors can be used to create “grab” points by constraining them to other limbs, objects or characters.
Increasing the IK Blend value on the Auxiliary Effectors and reducing it on the Main Effector, “pulls” the Effector towards a grab point. The nice thing about this is, the constrained motion does not affect the existing animation on the Control Rig.
Create Aux Effector
- Find a “Hold” Frame: Find a frame where the hand is holding the prop. For example, if the character begins the action holding the prop with both hands, use the start frame.
- Refine the Hold: Adjust the position of the hand and pose the fingers to create a solid looking “Hold” pose, and set a key frame.
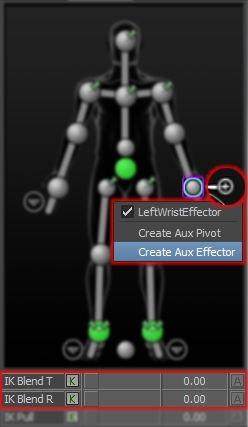
- Create Aux Effector: Right-Click the Wrist Effector and select Create Aux Effector from the pop up menu. Left-Click the “+” sign that appears next the Main Effector to see the Aux Effector associated with it.
- Turn IK Blend OFF: Select the Aux Effector and set the IK Blend values to 0. This makes sure the motion of the arm is driven by the original animation on the main Wrist Effector not the static Aux Effector. If both Effectors are active, the Wrist will try to “reach” both IK goals and end up in the wrong position, halfway between them.
Constrain Aux Effector to Prop
- Add Parent Constraint: Drag a Parent/Child Constraint from the Asset Browser>Constraints tab into the Viewer window. Or, Left-Click-Drag the constraint directly onto the Aux Wrist Effector – it will turn green to show it is selected – and select Constrain Object from the pop-up menu.

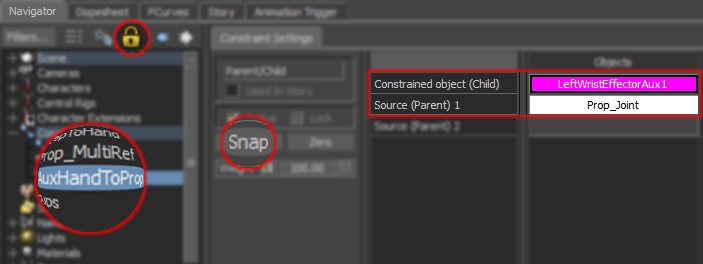
- Lock Constraints Setting Tab: To stop the information in the Constraint Settings window changing when you select another object, click the yellow padlock icon. If the window has already changed, expand the Constraints tree in the Scene Browser and Double-Click the Parent/Child Constraint you just created.
- Constrain Aux Effector: If you didn’t constrain the Aux Effector in step 2, Alt-Left-Click-Drag it from the viewer window into the Constrained object (Child) slot in the Parent/Child Constraint.
- Add Prop as Source Object: Alt-Left-Click-Drag the “Prop joint” into the Source (Parent) 1 slot.
- Snap Constraint: Click Snap in the Constraint Settings window to activate the constraint. Using Snap will preserve the current offset between the Prop and the Aux Effector.
- Rename: Right-Click the Parent/Child constraint in the Navigator>Constraints window and select Rename from the menu. Rename the constraint something descriptive, for example “AuxHandToProp”.
- Unlock Constraints Setting Tab: Once the constraint is set up, click the yellow padlock icon to unlock the Constraints Setting tab.
- Additional Grab Points: Create a separate Aux Effector and Parent Constraint set-up for any additional grab points.
Grabbing a Prop
- Key Reach Frame: Find the frame where the hand begins to “reach” for the prop. Make sure the IK Blend values on the Main IK Effector are set to 100 and Left-Click the “K” button next to them to set a key frame. The square should turn Red and the “A” at the end of the slider should turn a lighter shade of grey. On the same frame, set the IK Blend values on the Aux Effector to 0 and set a key frame on those.

- Key Grab Frame: Find the frame where the hand makes contact with the prop and begins to move with it. Set the IK Blend values on the Aux Effector to 100 and key frame them. On the same frame, set the IK Blend vales on the Main Effector to 0 and set a key frame on those. The hand should now follow the Aux Effector, which is constrained to the prop, which is constrained to the right hand. Unlike some programs, this does not create a cyclical error in MotionBuilder.
- Check Transition is Smooth: Using the Transport Controls, scrub over the frames where the hand moves towards the prop and the IK Blend values change. The motion should be smooth and there should be no sudden changes in speed or direction. If this happens, try changing when the blend values change or the interpolation between them in the FCurves window. For example, set the interpolation to Lin(Linear) for a gradual transition, or move the keys to the same frame and set the interpolation to Stepped for an instant switch.
Releasing a Prop
- Key Hold Frame: Find the frame just before the hand releases the prop and begins to move freely. Make sure the IK Blend values on the Aux Effector are set to 100 and key frame them. On the same frame, set the IK Blend values on the Main Effector to 0 and key frame those.
- Key Release Frame: Find a point at least 4 frames after the “Hold” frame, where the hand is moving freely (the number of frames needed to create a smooth transition will depend on how quickly the hand is moving). Set the IK Blend values on the Aux Effector to 0 and key frame them. On the same frame, set the IK Blend vales on the Main Effector to 100 and set a key frame on those. The hand should now be moving freely and following the original animation on the Main Effector.
- Check Release is Smooth: Using the Transport Controls, scrub over the frames where the hand releases the prop and the IK Blend values change. The release should be smooth and there should be no sudden changes in speed or direction. If this happens, try changing when the blend values change or the interpolation between them in the FCurves window. For example, set the interpolation to Lin(Linear) for a gradual transition, or move the keys to the same frame and set the interpolation to Stepped for an instant switch.
Save File
Before you prepare the file for export, save a final “Edit” version of the file. This will be the version of the file you reopen if you need to make any changes.
Update the version number at the end of the file name – this will be V006 if you’re still playing along at home. Don’t be tempted to use “_FINAL_” in the name as it very rarely is and you’ll end up with “_FINAL_FINAL_V010” and so on.
11 Plot Animation
Once all the animation is complete, you will need to plot the motion onto the skeleton and prop joint ready for export. Depending where you want to apply the key frames, there are a couple of ways to do this:
FOR MAXIMUM COMPATIBILITY, THE ANIMATION MUST BE PLOTTED ONTO THE BASEANIMATION LAYER
…onto Skeleton
- Open Character Settings: Double-Click the Character in Scene Browser>Characters branch and switch to the Character Setting tab.
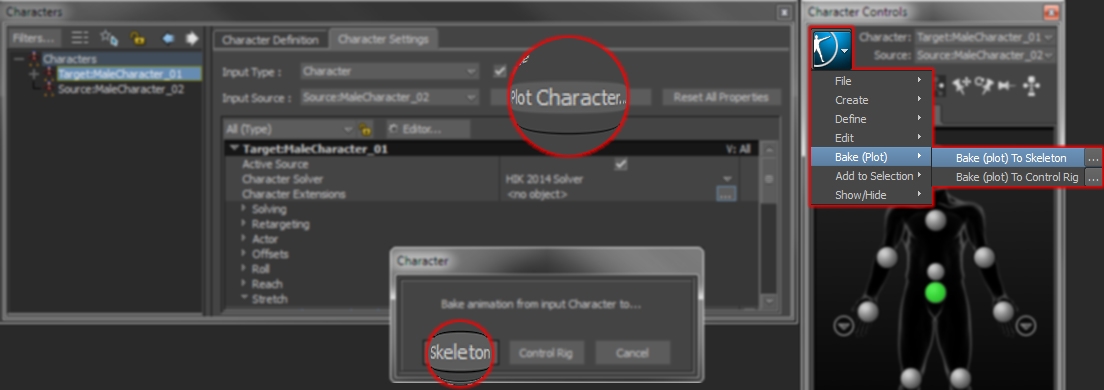
- Plot Character… to skeleton: In the Character Settings tab click Plot Character… and select Skeleton from the Character message window. Alternatively, in the Character Controls window select Bake (Plot) > Bake (plot) To Skeleton from the Character Controls menu button
- Set Plot Options: In the Plot Selected Properties pop-up window, plot the animation using the Suggested Settings below as a guide.
…onto Objects or Props
- Select Objects: Items not included in Control Rig – for example, the “propRoot” or prop hierarchy – can be selected from the Scene browser, Navigator or the Schematic View using the following methods:
- Select Multiple Objects: Ctrl+Left-Click, SpaceBar+Left-Click or Left-Click+Drag
- Select Object and Children: SpaceBar+Right-Click.
- Select Elements in a Namespace: using Edit>Select By Namespace, and selecting the appropriate namespace from the browser.
- Select Objects By Name: In the Viewer window press Shift+n to open the pop-up. In the “Enter model name” field type the name of the objects, including namespaces and wildcards (*). For example, “*:*_skinJoints” will select all the joints ending “_skinJoints” in any namespace or “prop:*jnt*” will select any object in the “prop” namespace with “jnt” in the name.
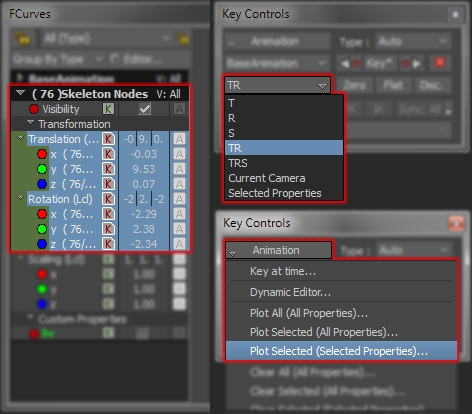
- Select channels to plot: In the Key Controls window, select the correct Keying Mode for the properties you want to plot. For example, to plot just the Translation and Rotation properties on an object select TR. Alternatively, select the channels you want to plot in the FCurves window.
- Plot Selected: In the Key Controls window, select Plot Selected (Selected Properties) from the Animation menu.
- Set Plot Options: In the Plot Selected Properties pop-up window, plot the animation using the Suggested Settings below as a guide.
…onto Custom Properties
- Select Objects: Select the objects in the Scene Browser, Navigator or Schematic View using one of the methods described above.
- Select Custom Properties to Plot: In the FCurves window, scroll down to the Custom Properties section and select the custom properties to plot.
- Plot Selected: In the Key Controls window, set the Keying Mode to Selected Properties and select Plot Selected (Selected Properties) from the Animation menu.
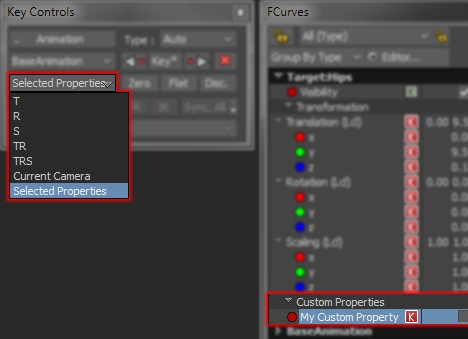
- Set Plot Options: In the Plot Selected Properties pop-up window, plot the animation using the Suggested Settings below as a guide.
Plot Settings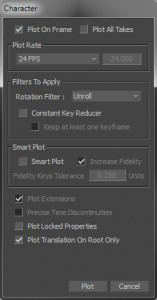
- Plot On Frame = ON
- Plot All Takes = OFF – unless there are multiple take ready to plot
- Plot Rate = Match Transport Controls>Time Format Menu
- Rotation Filter = Unroll
- Constant Key Reducer = OFF
- Smart Plot = OFF
- Plot Locked Properties = OFF
- Plot Translation On Root Only = ON
Check Plot
Once everything has been plotted, turn off all the constraints to make sure the animation has been plotted correctly. Also check the key frames have been applied to the required channels at the correct frame rate.
- Turn Control Rig OFF: MotionBuilder automatically turns the Control Rig OFF when Plot Character… or Bake (plot) To Skeleton are used. If you didn’t use one of these options, you will need to turn the Control Rig OFF manually. Double-Click the Character in Scene Browser>Characters branch and open the Character Settings tab. Then, Left-Click the tick (ü) in the Input Type: > Active box to deactivate the Control Rig.
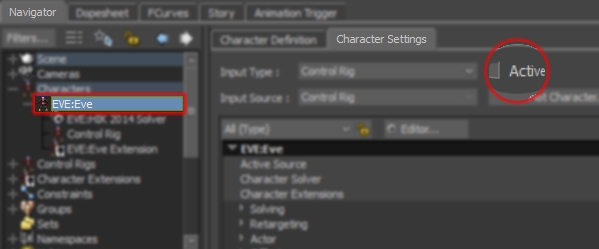
- Turn Constraints OFF: In the Scene Browser, Double-Click the Constraints branch to open the Constraint Settings pane. In the Constraints Settings pane, Left-Click Active all at the top of the column to turn all the constraints OFF.

- Play Animation: In the Transport Controls, turn on Looping and press Play. Switch between the Orthographic (Ctrl+f, Ctrl+r) and Perspective (Ctrl+e) views to make sure the animation looks correct from every angle.
- Check key frames: With an object selected, select the Translation, Rotation and Custom Properties channels in the FCurves window to see all the key frames. Make sure the required channels have been plotted and that they are at the correct frame rate – they are on a frame.
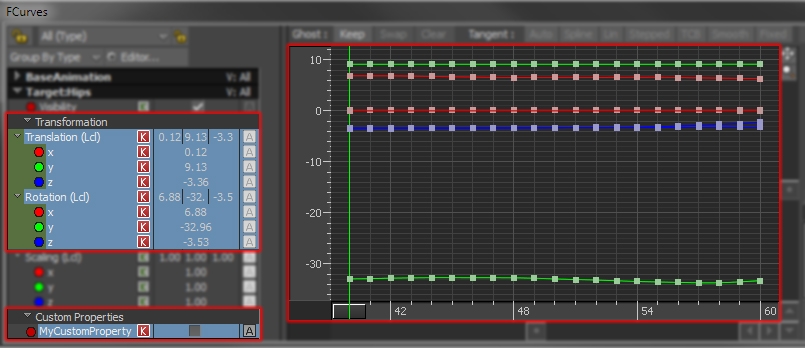
If the plot has not been successful, reactivate the all constraints and try repeating the steps in the Plot Animation section.
DO NOT REPLOT ANIMATION TO THE CONTROL RIG. This will plot all the edits you’ve made on to the BaseAnimation layer of the Control Rig, making it impossible for you to adjust them. Instead, make sure the Input Type is still set to Control Rig, and reactivate it.
12 Export FBX
The final step is to prepare the file for export by deleting any unnecessary objects. This isn’t always necessary, but it will help improve compatibility with other software.
Rename Take
- Select Take: In the Navigator window, Double-Click the Takes branch to expand it and open the Take settings window.
- Rename the Take: Right-Click the Take Name in the Scene Browser and select Rename from the pop-up menu. Or Double-Click the Take Name in Takes settings window and type a new name and Hit Enter to confirm.
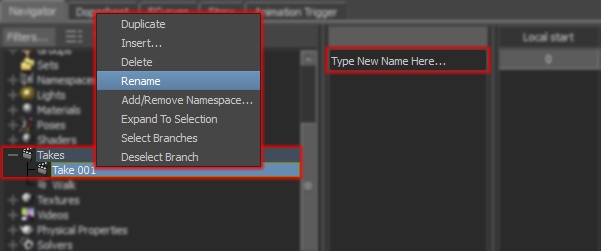
Delete Take 001
If Take 001 doesn’t contain any animation, Right-Click it in the Scene Browser and select Delete from the pop-up menu.
Delete Character Animation Track
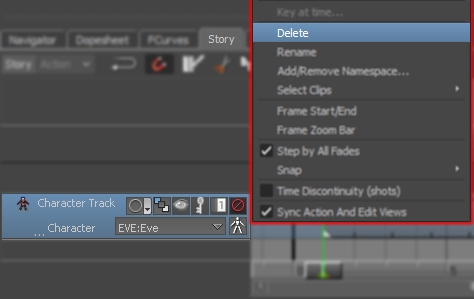
- …using pop-up Menu: In the Story window, Right-Click the Character Animation Track and select Delete from the pop-up menu.
- …using the Keyboard: In the Story window, Left-Click the Character Animation Track to select it and press Delete on the keyboard.
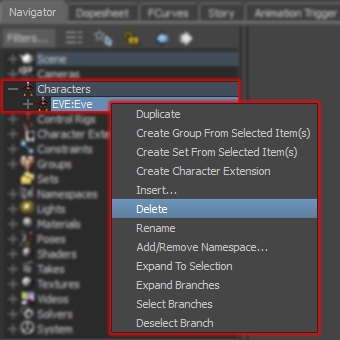
Delete Characters
- Delete Character: Expand the Characters branch in the Scene Browser. Right-Click the character and select Delete from the pop-up menu.
- Yes To All Warnings: In the Delete Constraints Warning window, Left-Click Yes To All.
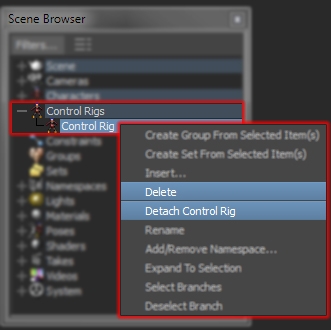
Delete Control Rig
- Detach Control Rig: In the Scene Browser, expand the Control Rigs branch. Right-Click the character’s Control Rig and select Detach Control Rig from the pop-up menu.
- Delete Control Rig: In the Scene Browser, Right-Click the Control Rig again and this time select Delete from the pop-up menu.
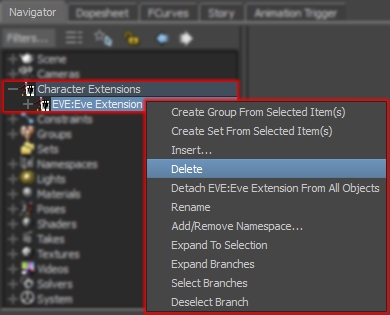
Delete Character Extension
- Delete Character Extension: In the Scene Browser expand the Character Extensions branch. Right-Click the Character Extension and select Delete from the pop-up menu
- Ok Warning: Ok the warning in the Reference Object Change window.
Delete Constraints
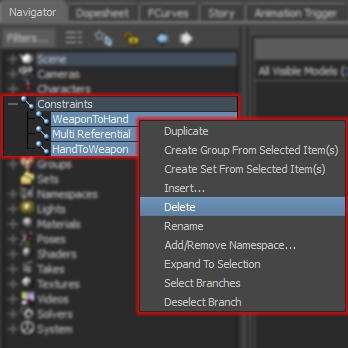
- Select Constraints: In the Scene Browser, expand the Constraints branch and select all the constrains.
- Delete Constraints: Right-Click one of the selected constrains and select Delete from the pop-up menu.
- Yes To All: In the Delete Constraints Warning window Left-Click Yes To All
Delete Poses
- Select all the Poses: In the Pose Controls or Scene Browser window, expand the Poses branch and select all the poses using Shift+Left-Click or Ctrl+Left-Click. Alternatively, Right-Click the top of the Poses branch and choose Select Branches from the pop-up menu.
- Delete Poses: Right-Click one of the selected poses and choose Delete from the pop-up menu.
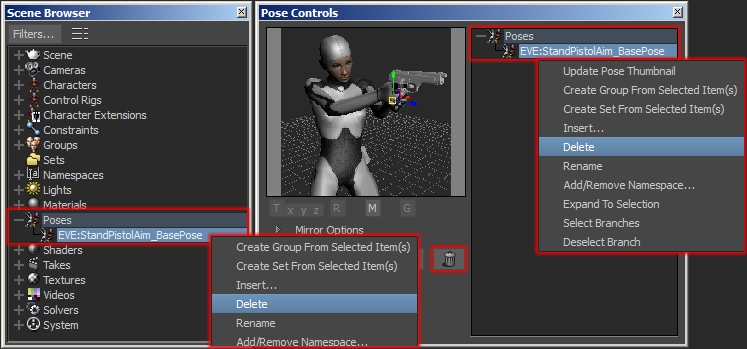
PLEASE NOTE: If you use the Select Branches method you will get a warning saying “One or more of the objects cannot be deleted”. This is because the Poses object gets selected along with the branches and this cannot be deleted. You can ok the warning.
Rescale Character
- Select Scale Node: In the Schematic View select the object used to rescale the character.
- Check for Scale Key Frames: In the FCurves window, select the Scale channel and make sure there are no key frames on it. Any keys frame must be deleted or the character will return to its current scale when you try to reset it in the next step.
- Rescale to 1: In the Properties tab or Global/Local fields in Viewer window, type the original scale value for the character, for example 1. Play the animation to make sure the rescale has worked.
Remove Namespace
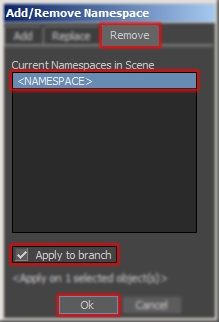
- Select Character’s Namespace: From the Edit menu choose Select By Namespace… In the Select By Namespace window, click the character’s namespaces, followed by Select branch and then Ok.

- Remove Namespace: From the Edit menu select Add/Remove Namespace… In the Remove tab of the Add/Remove Namespace window, select the character’s namespace, click Apply to branch followed by Ok.
Save As…
- Save the File: From the File menu select Save As… and use the Save File browser to navigate to a location you want to save the file. For example, an “EXPORT” folder that contains the finished/approved versions of the files.
- Set the File Name: Rename the file so it is obvious what it contains. For example, replace the “EDIT_V006” with EXPORT_V001”.
- Saving Multiple Takes: If you have been working on multiple takes, you can save them all out as individual files using the take name as the file name. Type anything in the File name field (MotionBuilder will not allow you leave this blank) and select Save One Take Per File and Use Take Name. If you do not select Use Take Name, MotionBuilder will rename the file to <FILE_NAME> – <TAKE_NAME>.fbx.
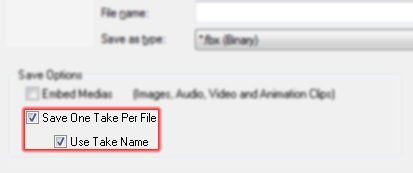
- Save Everything: Unless there is an element in the file you do not want to save, make sure all the assets selected (Scene Elements, Animation, Settings and Takes). Click Save

Hopefully this tutorial has shown you how edit props and poses if you’ve never done it before, or given you a few ideas to add to your current workflow.
As you can tell from the length of this tutorial, applying a pose to a character isn’t easy, especially when props are involved.
So if you need any help, let me know where you’re stuck by leaving a comment below.
Thanks for these. This is great. Though I’ve been working w Mobu for 6 years. I learnt a few new things today.