In this tutorial I will show you how you can use MotionBuilder’s Actor asset to re-target optical motion capture data onto your character. Once the Actor is set up in this way it can be used to retarget optical data directly to your character either in real-time during a shoot for pre-viz purposes or after the shoot when you are ready to begin editing the data.
Importing marker data
- Import marker data. The first step is to import a marker data file ( *.trc or *.c3d ) into a new MotionBuilder scene. Ideally this file will contain the performer standing in a T-Pose with all the markers identified and any errors corrected.
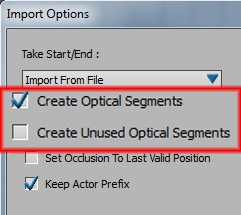
- Create Optical Segments. In the options box tick Create Optical Segments and un-tick Create Unused Optical Segments as the Unused Optical Segments aren’t required and will only confuse your scene.
Creating an Actor
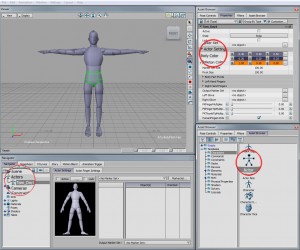
- Create an Actor. Drag an Actor in to your scene from the Asset Browser>Characters folder
- Rename Actor. Rename the Actor to something more recognisable like the performer’s name you’re creating the set up for. This way it’s easy to find the corresponding Actor in the scene if you need to make changes. I also include anything special about the set up like a day number or costume type. It may take a little more time to set up your scene this way, especially if you are under pressure to get a scene ready, but naming everything in your scene can save you a lot of time and pain later.
- Change Actor Colour. If you are going to have multiple actors in your scene for live previz you can change the colour of the Actor in the Properties>Actor Settings>Body Colour tab.
Aligning the Actor
It is helpful to have reference showing where the markers were placed on the performer so you can align the Actors limbs to match. Ideally you would have photos of the performer in their T-Pose for this or, if you are doing a set-up for live pre-viz, you can simply look at the performer in front of you.
- Align the Actor’s hips to the waist markers. Select the hips of the Actor and align them with the hip markers in the scene, making sure the Actor is facing the right direction.
- Scale the Actor. Space-bar>Right-Click the hips of the Actor to select the all the body segments and uniformly scale them to fit the marker cloud as closely as possible.
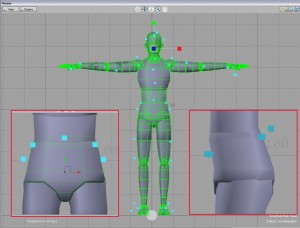 Scale the Limbs. Scale each of the Actors limbs to match the performers limbs using the markers as a guide.
- Rotate the Collar. When aligning the arms be aware that people usually lift their shoulders slightly when they raise their arms into a T-Pose. If you don’t replicate this on the Actor it will cause your characters shoulders to droop when they put their arms down. As a rough guide, I usually rotate the “Collar” segments up by about 10 degrees at this stage and then fine tune them later during an action where the performer has their arms down by their side.
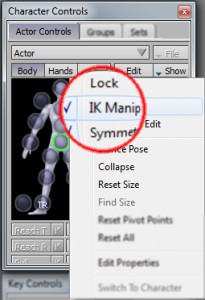
- Rotate the limbs. Each limb can then be rotated in to place or you can turn on the Character Controls>Actor Controls>Edit>IK Manip and drag the segments in to place. The IK Manip allows you to use pinning to lock body segments in place while you are adjusting other body parts. It also allows you to lock the rotation of segments like the feet, so they remain flat on the floor when dragging them in to position.
 Rotate the shoulders. Locally rotate the shoulders of the actor by about 20 degrees. One thing sometimes missed when aligning the Actors arms is that if you put your arms straight out they very rarely match the default angle of the Actors arms. Instead of being angled with the elbow pointing backwards, they are often angled with the elbow pointing slightly down by about 20 degrees. Always check this alignment using the marker positions as a guide.
Assigning markers to an Actor
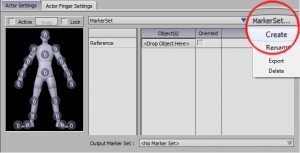
- Create a marker set. In the Actor Settings tab click the “Marker Set…” button and select Create from the drop down menu. You should see circles containing zeros appear over the Actor picture which you will Alt-drag the markers in to. MotionBuilder uses the markers you drag in to the cells to calculate the movement of the associated Actor segments.
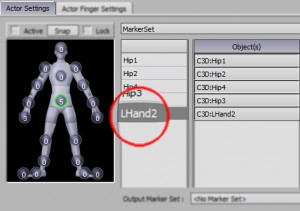
 Drag the markers into the Actor’s Body cells. Change your Viewer to X-ray mode ( ctrl+a ) and turn off the Actors skeleton to make it easier to drag select multiple markers without selecting any Actor segments. Make sure you don’t accidentally select the wrong markers when drag-selecting, or forget to clear the current selection before adding more to it. You may find i takes a little experimentation with the marker assignments to get the best solution for your marker set up.I usually drag the wrist and hand markers into the hand cells and the ankle and foot markers in to the foot cells leaving the wrist and ankle cells empty.
- Removing Markers. If you add a wrong marker to a cell, simply select the cell and delete the offending marker from the left hand column.
 Activate the Mapping. Once you have filled all the cells and checked the alignment of your Actor to the markers simply click Active to activate the mapping. You can check the quality of the mapping by scrubbing along the time line or by hitting Play, to see how well the marker data is being solved to the Actor. If some of the Actor’s limbs don’t appear to be solving correctly, you can refine their positions while the marker set is still active.
- Save the set-up. Once you are happy with the set up, save the file using a descriptive filename like the performers name plus the date. I would recommend creating a new set up file every time the performer removes their suit or the marker set-up is changed as this will affect the way the mocap data is solved by the Actor.
Importing New Takes
- Select the Optical Root. This will appear as a wire frame sphere at the centre of the scene in the Viewer window with “Model Only” mode turned off. It is also the top node or parent of the group of optical markers in the Schematic View or Navigator>>Optical window.
- Import Files. Using File>>Import… select individual files to import use shift/ctrl left-click to select multiple files. I would recomend only importing files captured on the same actor and the same day as the file used to create the Actor set-up.
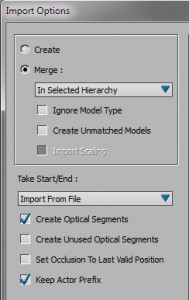
- In the Import Options window set the following options
- Merge: In Selected Hierarchy.
- Turn OFF create unmatched model
- Turn OFF Create unmatched optical segements as you shouldn’t need these in the scene.
- Turn ON Create Optical Segments
- Click import. You may get a warning saying that MotionBuilder couldn’t match all the model in the scene. This shouldn’t be a problem if your data has been clenaed and all unidentified markers rectified correctly.
Mapping to a Character
- Merge a Character. File>Merge your character in to the scene.
- Set Input Type:Actor. Change your character’s Input Type: to Actor Input and change the Input Source: to the Actor and tick Active.
- Adjust the Actor. The positions of the Actor segments relative to the markers may require minor adjustments each time you import a new take to improve the results from the solve. You may also need to adjust the various re-targeting options in the Character Settings tab depending on the size difference between the proportions of the performer and the proportions of your character.
This Actor Set-Up can also be used to stream live data from a capture system directly on to your character in real-time – but I shall save that for another post…..
This is such a useful page, thankyou so much for this.
Great article – very useful
Where is “another post”? 🙂
It’s coming….some day 😉
Is live streaming something you’re interested in?
Thanks for tutorial.
I have a some questions.
1. If a character is taller than this actor or it’s hands are shorter than actor’s or the chest is smaller etc. Should we correct this? How?
2. In the T-position my character’s and actor’s hands are on the same line. But in neutral position character’s hand are much closer to body and even itersects with it. I rotated collars up a little bit, it helps a little bit, but anyway the difference in hand’s position (between actor and character) is big. How to fix this?
3. How to kill abnormal forearm’s rotation in local X-axes?
Thank you.
Hi Victor,
Thanks for the questions
1.You will need to correct any interactions if you character has different proportions to your actor. Try using Reach IK/IK Blend T and constraints to fix the characters hands if they need to stay planted, for example on the floor or a table. For quick interactions like head scratching, it’s sometimes easier to plot the actions to a control rig and fix the problems on a layer.
2.Have you tried rotating your characters arms up in the Characterization T-Pose to offset them from the actor? if it’s only a small adjustment this can sometimes help, but generally I would say get the most accurate mapping and then fix any issues using control rigs and layers. This will give you must more control over the final animation.
3.This will depend on what’s causing abnormal forearm rotation. You can lock the rotate axis in the joint Properties>Degrees of Freedom>Rotation. Or you can change the Roll values in Character Settings>Roll menu to limit their effect.
Hope this helps…